2019 Topic 11: Retro Colour Palettes
These
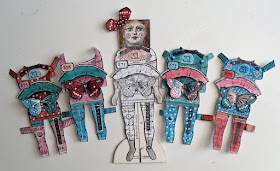
stamps by Lynne Perrella are great fun, and Helen has turned one into
several with bespoke clothing! This could be a fun holiday activity for
any budding school age crafter, or even older ones! ~ Leandra
Hi everyone, it's Helen with
you today, and I'd like to share with you my retro colours project. I
decided on a retro toy to go with my 50's colour scheme. I remember Jo
making one of these for a post a while ago but these new Lynne Perrella
stamps lend themselves perfectly for this so I'm giving it another go.
I've also added another type of doll to the collection.
The hardest part of all was choosing the colour palette! If you put 'retro colours' into Google you get so many results you don't know where to start. All I knew was that I didn't fancy the 70's brown colour scheme as the wallpaper in my first flat was a large brown, orange and purple floral design - gave me nightmares! So I've picked what I hope is a sort of 50's diner colour palette
The hardest part of all was choosing the colour palette! If you put 'retro colours' into Google you get so many results you don't know where to start. All I knew was that I didn't fancy the 70's brown colour scheme as the wallpaper in my first flat was a large brown, orange and purple floral design - gave me nightmares! So I've picked what I hope is a sort of 50's diner colour palette
I just stamped the doll onto mountboard using an ATCoin to draw the base and make the stand.
She'll stand like this:
The
clothes are stamped onto glossy card - note the different necklines to
add variety. I coloured these with Distress markers which is very quick
and easy. However when I tried to colour the doll herself the same way,
the mountboard was just too porous to allow for any blending so I used
pencils instead.
Here
are all the outfits embellished in different ways. I've added a few
dotty areas as I felt that gave it a '50's' look - might be quite wrong
there, but I liked it! The bow is made from the butterfly wings:
Once I'd started I was on a roll so decided to make a jointed doll. You need two stamped images for each doll:
Then you just cut out the pieces ...
...
and join them together. At this point you can go on and add a string
pull to make the legs and arm move, but I've always thought they look a
bit peculiar so I left it at this.
You can have great fun posing them - they're really quite athletic (unlike me!)
My
original plan was to create a different coloured outfit for each decade
but I got so confused with all the colour palettes that I gave up on
that idea!
When you do stamp the image for the outfits it's
worth drawing on the tags before you start cutting out as it's very
easy to just cut them off. I've had a lot of fun making these - as usual
there's a lot of detail in the Lynne Perrella stamps which makes them
easy to embellish. Just think, you could make a whole dancing troupe of
the jointed dolls - add some net skirts and the can-can comes to mind!
Helen
Blog: A Splash of Colour


These are brilliant, Helen
ReplyDeleteGorgeous dolls Helen ... love the one doing the splits !!!
ReplyDeleteLove this trio with their moveable limbs - delightful.
ReplyDeleteAlison x
Lovely paper dolls with Lynne's new stamps Helen!! and fabulous there dance. xx
ReplyDeleteGreat idea, love it!
ReplyDeleteFantastic project Helen! Love the moveable limbs. X
ReplyDeleteI love your paper doll project AWESOME xx
ReplyDeleteWhat a fun project! Helen . Your moveable dolls are wonderful and cleverly created . Inspiring indeed
ReplyDeleteAmanda x
What a fun project , Helen . Your moveable paper dolls are wonderful . Clever Creativity .
ReplyDeleteAmanda x
What a fun project , Helen . Your moveable paper dolls are wonderful . Clever Creativity .
ReplyDeleteAmanda x
Yor moveable paper dolls are wonderful , Helen . Such a clever inspiring idea .
ReplyDeletex
How fun are they ! Love them !
ReplyDeleteCorrie x