2017 Topic 18: Torn, Ripped, Burnt
Hi everyone, it's Chris with you today, and I'd like to share with you a couple of items I've made for this fortnights topic, Torn, ripped, burnt; all topics that appeal to me because they create texture and an extra level of interest to a project.
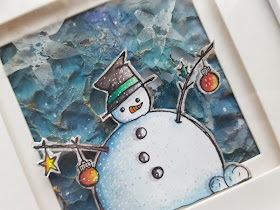
Lutradur fabric came to mind as perfect to incorporate the techniques and create fantastic texture for my backgrounds. Lutradur is a spun bound non woven stabiliser often used in quilting and dimensional free style embroidered art, qualities of the fabric are that it can be dyed, stamped, die cut, painted with water based paint or acrylic and heated with a heat gun or soldering iron to give bubbled texture, holes and lacing. I decided to try painting it this time with acrylic paint as previously I've only used water based mediums. I've also had fun with the gorgeous JOFY winter stamp set JOFY58
Lutradur fabric came to mind as perfect to incorporate the techniques and create fantastic texture for my backgrounds. Lutradur is a spun bound non woven stabiliser often used in quilting and dimensional free style embroidered art, qualities of the fabric are that it can be dyed, stamped, die cut, painted with water based paint or acrylic and heated with a heat gun or soldering iron to give bubbled texture, holes and lacing. I decided to try painting it this time with acrylic paint as previously I've only used water based mediums. I've also had fun with the gorgeous JOFY winter stamp set JOFY58
I
found a great little frame with a layered mount allowing room for the
dimensional fabric and the fussy cut JOFY Snowman that I watercoloured
with Inktense pencils.
This
is how the Lutradur looks before the painting and heating is done, if
you sew you may be familiar with the appearance of it as it is similar
to iron on interfacing. You can embroider the fabric and then paint it
and the stitching becomes a resist during the heating process.
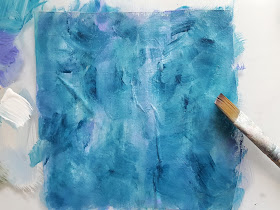
I've painted the a Lutradur to see how it would affect the heating process. I used a gorgeous combination of Fresco Finish Chalk Paints in Lavender, South Pacific, Stone and Chalk.

I've painted the a Lutradur to see how it would affect the heating process. I used a gorgeous combination of Fresco Finish Chalk Paints in Lavender, South Pacific, Stone and Chalk.
When
the paint was completely dry I applied heat with a heat gun and after a
few seconds the fabric starts to pucker and lace into tiny or larger
holes depending how close the heat gun is to the fabric and for how
long. You can see all the lovely texture above. Take care as the fabric
can disintegrate if the heat is applied for too long. Use a heat gun
with care, it will become very hot and I recommend using a tool to hold
the fabric down as it's lightweight and this will protect your fingers
too.
I
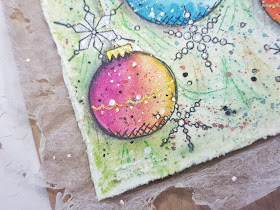
also made a Christmas card with the baubles stamp, watercolouring as
before and this time leaving the Lutradur unpainted. I also die cut the
stars that you can see in the framed piece from this piece of fabric.
You
can see here how I've manipulated the heating of the Lutradur to create
larger holes in some places and a ripped style edging by allowing the
fabric to curl. I have a dual speed heat gun and I kept it on the lower
setting and about one centimetre above the fabric.

Here's a closer look at the texture on the painted Lutradur where I went over it with gilding wax to highlight it, I backed the Lutradur with white paper to show through where there were holes.
This was the first time I had painted Lutradur with acrylic paint and I liked how the process turned out. I've learned that keeping the paint to one layer and thinned down gave the best results for the lacey holes effect, when the paint was thicker I got more of a puckering effect. I also like that you can choose which side of the fabric to use as you get a positive and negative from the heating, it's great that the paint goes right through to the other side too. It's an enjoyable learning curve finding the optimum time to heat the fabric and how close to hold the heat gun and you pretty much have to be accepting of what you get but that is the fun of creating so I hope you will have a go and join us in the challenge.
Thanks for joining me and I hope you have a creative week.
Chris x
Blog: www.sketchingstamper.blogspot.co.uk
Facebook: https://www.facebook.com/christine.dark.7:
Instgram: @chrisd999
Pinterest: https://uk.pinterest.com/cdark4163/
Find my classes at The Craft Barn
Fantastic backgrounds Chris - you have certainly mastered the controlling of the fabric with heat! Beaautiful
We always hope that you learn something interesting from our blog.
Our creative team love to read your comments so much, so please take time to let them know you've been inspired!
Why not join our 2-weekly challenge by blogging your create response to the current topic and link it here?
Our creative team love to read your comments so much, so please take time to let them know you've been inspired!
Why not join our 2-weekly challenge by blogging your create response to the current topic and link it here?
The current topic link Topic 18: Torn, Ripped, Burnt will close 17:00 (London Time) Sunday, 10th December 2017, and the winner will be announced 2 hours later at 19:00.
All links go in the draw to win a £50 voucher to spend on products of your choice from the PaperArtsy online store.
All links go in the draw to win a £50 voucher to spend on products of your choice from the PaperArtsy online store.


Both beautiful! I think I have some Lutradur, must try this technique!
ReplyDeletefab card, Chris!
ReplyDeleteI love them both!!!
ReplyDeleteFab images and your makes ROCK!
ReplyDeleteKathyk
Never heard of the lutrador, so thank you for the inspiration...will be giving this a go x Such a fun first project and love the contemporary card x
ReplyDeleteOh Chris these are such lovely projects! The snowman in the frame is gorgeous - he looks great against the background (& the way you coloured him is very clever- really effective!!) and the baubles panel is so pretty!! Thank you for using the stamps in such a gorgeous way!! oooh I love it all!! made me feel all festive!
ReplyDeleteJo x
So very lovely !
ReplyDeleteCorrie x
Ohh myy gosh! If this isn't the coolest thing ever! I'm crazy over your process and finished pieces. The layered frame is absolutely MADE for this snowman and you've painted him beautifully. Truly delightful take on the theme. Hugs, Autumn
ReplyDeleteTwo gorgeous projects, I love the framed snowman.
ReplyDeleteBeautiful projects and great result. Lovely work with Jofys fabulous Christmas stamps. xx
ReplyDeleteChris, this is the most perfect background for that cheerful snowman - beautiful project.
ReplyDeleteWishes
Lynne
Thanks very much ladies, I really appreciate your comments! X
ReplyDeleteI have never ever heard of Lutrador but I will definitely be looking it up now that I have seen the amazing results you got Christine. As ever, I am in awe...
ReplyDeleteLx