2016 Topic 8: White Space
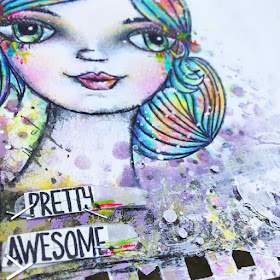
Hi everyone (Kassa Hayselden) here, joining you this evening with a post with the theme ('white space') I loooooves 'white space' art as it allows colours to jump right outta the page as you can see here on my finished loose journal page.
Colour rocks my world, makes for what I call my 'happy art', this beautiful face from Clare Lloyd's ECL09 stamp set simply drew me in, tis those huge eyes, I couldn't wait to go crazy with colour and bring her to life...
Step One: So on artist quality smooth paper stamp out the face (I let the edge of the image hang off the page - only missing a little of her hair-do!) I set to with my colouring pencils and layered, layered, layered the colours...patience is the name of the game and not being afraid of colour!
Step Two: Around the bottom and left side edges I fingerpainted with a mix of PaperArtsy Fresco finish; Guacamole; Zesty Zing; Limelight; French Roast chalk paints - letting each colour dry brfore applying the next (carefully missing the face)
Step Three: Once the paint has dried, take your fav stencil, (I used a small various sized circles one here) and stencil some PaperArtsy Fresco finish Lilac chalk paint over the paint, into the centre of the white space and on the neckline too!
Step Four: Once dry paint gesso over the white space and over the coloured stenciled circles, apply more in the middle, top and right hand side, sprinkle a little talcum powder into the gesso as you paint it in....makes for a thicker coat where you can scribble and scratch random lines/words in! Just one thin layer of gesso is needed towards the face and over the lilac coloured stencil circles, so the details peep through!
Step Four: Once dry paint gesso over the white space and over the coloured stenciled circles, apply more in the middle, top and right hand side, sprinkle a little talcum powder into the gesso as you paint it in....makes for a thicker coat where you can scribble and scratch random lines/words in! Just one thin layer of gesso is needed towards the face and over the lilac coloured stencil circles, so the details peep through!
Step Five: Again take a couple of your fav stencils and add texture paste through, adding more down the bottom and around the face/neck area (this grounds the face) do stencil the paste up into the white space to break it up, makes for more interest (along with the gesso'd scribbles) So your white space is still white space but with detail now!
Step Six: Finally I add little finishing details. flashes of uber bright paint on the hand drawn in eyelashes and a spot of aqua shiney foil too - makes for magical sparkley eyes! A couple of stapled on words from the quotes, softly and loosely re-define the stamped image with a black pencil and ink pen (add a few extra scribbles along the way) And I just had to finish with a few white splats and the stamped text.
I have loooved every minute of this challenge, tis the prettyiness of her face and WoWzers the size of the face (tis approx the size of the palm of my hand eeeeep!) so being a little different to the size of faces I normally stamp out has made this more fun and I feel easier...why not see for yourself...
mwah
Kassa xoxo
Instagram - https://www.instagram.com/karen.hayselden/
Twitter - https://twitter.com/khayselden
Wow Karen, we just love your girl, those splashes of colour just jump right off the page. You have transformed Clare's origina into much more than just a stamped image. ~Darcy
The PaperArtsy blog challenge is an opportunity for you to play along with the ideas our bloggers present. The current topic is #:8 White Space. You can put your own twist on the ideas presented, share or try something totally new. As long as it fits the theme we would love to see what has inspired you! So please join in and link up your creativity HERE to your own blog post.
All links go in the draw to win a voucher to spend on products of your choice from the PaperArtsy online store. This link will close 19:00 (London Time) May 1st 2016


Love her and the decoration around her
ReplyDeletethis is totally stunning...love it!
ReplyDeletethis is totally stunning...love it!
ReplyDeleteSo gorgeous!! I love all the layers of colour.
ReplyDeleteKassa, you are a complete wizard with colour!!
ReplyDeleteLove it Kassa!
ReplyDeleteStunning Kassa, always love your colouring:-) xxx
ReplyDeleteFab colouring. She looks super-cool. Lx
ReplyDeleteShe is lovely and fab her colours, great effected the white space. xx
ReplyDeleteAbsolutely stunning, I have this girlie and love her...you have made her even more beautiful..something I thought was impossible! Love ♥♥♥ her. xxx
ReplyDeleteWow, this is fabulous! X
ReplyDeleteLove this; her rainbow hair is amazing!
ReplyDeleteStunning work! I absolutely love the way you colored the stamped image. Thanks for the inspiration! :)
ReplyDeleteThis really is fabulous! Adore the hair! Chrisx
ReplyDeleteWhat wonderful colouring and love the texture at the bottom! Beautifully done!
ReplyDeleteHugs
Lesley Xx
Gorgeous! Beautiful use of white space. My take will be on the PA blog tonight - hope you will come and visit me too :)
ReplyDelete