2015 Theme 6: Grunge Paste
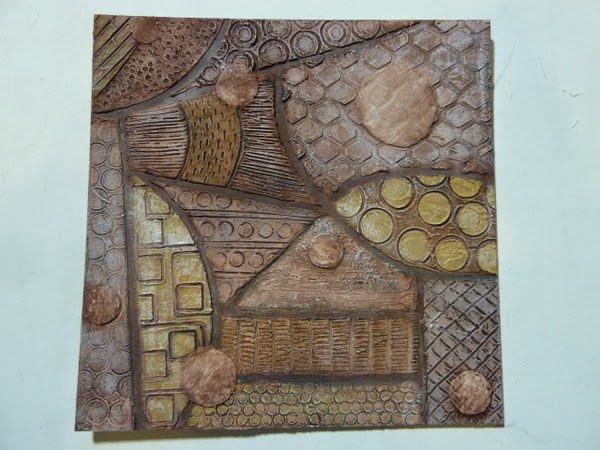
Hi everyone, Darcy here. I love this current theme, I adore layers and texture. I had this idea to create a piece that was all about texture and pattern, using a limited palette and found objects as mark making tools.
I began by collecting up some random objects, lids - square and round, a store card, a tooth pick etc.
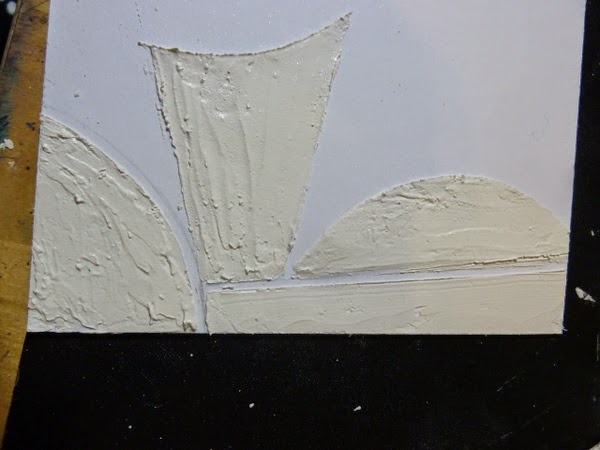
I then cut out a semi circle from heavy card and using this as a template I began to apply Grunge Paste to an 8x8 white/greyboard. This is the ideal substrate for this as it is solid and firm and with a smooth surface it takes the grunge paste and paint really well.
I continued adding shapes of Grunge Paste, using the cut out card and a ruler as my guides. I left a small gap between each shape.
As the paste started to dry I began adding patterns using my found objects.
I continued until the board was full, using lids to creates shapes and the cocktail stick to make small marks and scratches.
This was left to dry overnight, then I added a second layer of Grunge Paste in the form of just 7 circles, over the top of the other patterns.
Once this second layer was dry I painted the whole thing with a watery layer of Chocolate Pudding, making sure to push the paint down into all the lines and crevices.
Next I added so areas of colour, but keeping it fairly neutral I only used Caramel, Toffee, Chocolate Pudding,French Roast and Nougat.
I added Nougat to the edges aswell.
Around the sides of my pot of Grunge Paste were some bits that were quite dry, I scraped those out and kneaded them together, at this point the ball of Grunge Paste was more like dough. I pressed it flat and used ESN15 to impress some text into the Grunge Paste.
 |
| ESN15 |
As the piece dried I decided to break it apart.. smaller pieces would dry quicker and be more useful. I left these to dry ovenight.
Once dry I painted them with French Roast and then a little drybrushing with Buff, before adding Treasure Gold to the edges.
I added Treasure Gold to the 7 circles on the board, using Onyxite, Spanish Topaz and White Fire. Then I attached the text pieces using gel medium.
I gently rubbed White Fire over more of the raised parts, and this is it all done.
This was a particularly satisfying and relaxing project to make. I would really like to make a much,much bigger piece of wall art in this style. I hope you enjoyed it and that it has given you some ideas on how to use your Grunge Paste.
Darcy.
Blog - Art and sole
Twitter - Darcy_uk_
I will be on the PaperArtsy stand at Ally Pally 11th and 12th April. come and say hello.
We would love you to join in with challenge #6: Grunge Paste If you are inspired by any of our guests who blog with us over the fortnight, then please join in and link up your creativity HERE.
NB. you will get 3 weeks to participate in this challenge, as we will interrupt the usual schedule for our 3UP week which starts April 5th.
All links go in the draw to win a voucher to spend on products of your choice from the PaperArtsy online store. The Grunge Paste link will close 17:00 (London Time) Sunday, April 12th, winner will be announced 2 hours later at 19:00


What a beautiful, abstract project, Darcy. It was you who first introduced me to mark making using the most humble, but effective of tools in a demo at Ally Pally! I just love the effects you've achieved once again with things we can all access and play with! Really inspiring! Happy Easter! xx
ReplyDeleteA surprisingly simple but such an effective, piece of art. Love the muted colours.
ReplyDeleteSo beautiful, love the neutral colours with the touches of TG and all that yummy texture is fab X
ReplyDeleteWow, looks great. Love the colour combination.
ReplyDeleteIt's a Wombles dream, you get to snuffle up things and make something cool with it. This will look awesome on a greater scale.
ReplyDeleteFabulous Darcy. I love the texture. So simple and effective
ReplyDeleteIt's like painting with texture, very interesting...
ReplyDeleteI do like that Darcy, it looks really effective and I can see how it was fun to make.
ReplyDeleteGorgeous piece of wall art Darcy! I love it!
ReplyDeleteHugs
Lesley Xx
Loving the graphic composition and texture!
ReplyDeleteWhat gorgeous textures x
ReplyDeleteI think it's fabulous, so effective...yummy texture. It looks like it's been inspired a bit by the Chris Gryder tiles on the first post. Lovely carved effect. Ruth x
ReplyDeleteWow!!!! I Love Love LOVE this!!!
ReplyDeleteLovely. I would happily put this on my wall! C xxx
ReplyDeleteI posted on your blog
ReplyDeleteLove all the details
Thank you for sharing
xx
Pure dead brill bobs
ReplyDeleteWow, this is totally wonderful. Its like one big awesome doodle on texture paste! Love it.
ReplyDeleteThis is absolutely gorgeous Darcy, I love the textures, colours and constitution. Great imagination!! I was very inspired. xx
ReplyDeleteSensational piece of Abstract Art Darcy, can see why you want to make it into something larger. Some great tips here for your May Calendar challenge too, thanks for the inspiration :-) xxx
ReplyDeleteLove this. The texture and colours are delicious. Hugz
ReplyDeleteWow!!! Fabulous project, so inventive and inspirational!!! Thank you Darcy. Coco xx
ReplyDeleteDefinitely a work of art I would happily hang on my wall. It is stunning.
ReplyDeleteVery inspiring piece. Thanks for the great photo progress and "how to" and I do find the colour scheme you chose quite lovely.
ReplyDelete