Pages

Saturday, 28 February 2015

2015 #4 You're the Bees Knees! {by Emma Godfrey PA Signature Designer}

2015 Theme 4: Miniature Art

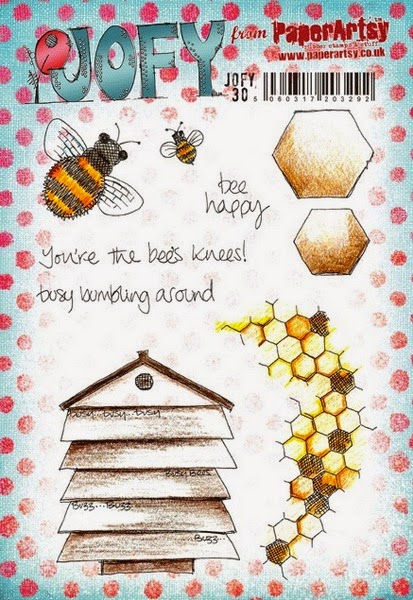
Hi everyone Emma here, joining you this evening with a post about shrink plastic. As soon as I heard the theme was miniature art, that is what I thought of. I love using shrink plastic, as it can give your stamps a new lease of life by changing the size of the finished image.    I also like the way that when you shrink the plastic, the colours become so much more vibrant, and the pieces add lots of dimension to a card. My finished piece is a small card using the JOFY30 stamp set.

Step One: I stamped my images from the new JOFY30 stamp set (available from your local PaperArtsy stockist) onto translucent shrink plastic using black Stazon ink.  


JOFY030


Step Two: I then painted them with Fresco Finish paints Pumpkin Soup, Toffee, French Roast and Metallic Glaze.   I kept the paints watery, but not too wet, as I knew the colours would be darker when the pieces were shrunk.  


Step Three: I cut out all the shapes, and then used a heat gun to shrink them.   Note: don't panic as they will curl up whilst being heated, but they will flatten out.  When they've shrunk as much as they will, press down on top of them with an acrylic block.


Step Four: My first plan was to use a card that was 5.5" square. I cut card mats in black and white card, and embossed the greeting in gold on the front. I also stamped the honeycomb stamp around the edge using Versafine Smokey Gray ink, and edged the black card mat with Brass Treasure Gold. I then stuck the shrink plastic pieces on with Glossy Accents.  Once it was finished I decided that it wasn't "miniature" enough...


Step Five: ... so I peeled all the shrink plastic pieces off of the big card, and decided to use a much smaller card (9cm x 9cm). I had to plan where I was going to place the pieces and the greeting, as there wasn't nearly as much room this time.   I repeated everything that I had done for the large card, just a condensed version.


I love how dinky this card is ... and also how the Metallic Glaze on the wings sparkles so much.


So do you prefer the larger card, or the smaller one? I think the shrink plastic images work rather nicely on both, but the smaller card is definitely my favourite. I've never used paint on shrink plastic before, and I was really pleased with the result. I'm thinking that it could be fun to make a small co-ordinating present to go with the card ... maybe a pair of bee earrings? Just remember to punch a hole big enough before you shrink (as that will shrink too!).
See you again soon!   Emma
twitter: @emmaimaginethat
blog: www.imaginethatpapercraft.blogspot.co.uk

Thanks Emma, this is a fabby little card. I definitely prefer the smaller version, so dinky. Shrink plastic does scare people because of its unpredictable curling but you have flattened yours beautifully. I love the Metallic Glaze on the wings, perfect finishing touch. ~Darcy

We would love you to join in with challenge #4: Miniature Art. If you are inspired by any of our guests who blog with us over the fortnight, then please join in and link up your creativity HERE

All links go in the draw to win a voucher to spend on products of your choice from the PaperArtsy online store. The Fresco Paints link will close 17:00 (London Time) Sunday, March 8th, winner will be announced 2 hours later at 19:00.

Friday, 27 February 2015

2015 #4 Mini Book {by Liesbeth Fidder}

  2015 Theme Four: Minature Art

 Hi, it's Liesbeth here ! Two weeks of PaperArtsy Miniature Art , I love it ! I just love to work very small, make tiny books, inchie things etc.
The cover of this mini book is made of two metal embellishment leaves, about 5 cm long. This is how I made it:


I cut a piece of Smoothy-white stamping card in half and started brayering thin layers of paint using Fresco paints. I started with Smurf

I repeated the same, layer over layer, with Hey Pesto, Zesty Zing, Glass blue, Hyde Park and Blueberry. I always love how the opaques and the translucents work together: beautiful.

I used the same colours of paint onto the other piece of paper, this time direct to paper, and I sprayed some water onto the surface while brayering.

 Two completely different backgrounds, matching great together.

I drew the pages' at the backside of both painted papers with a pencil, using the book cover,a metal leaf, as a pattern.

I stamped every page with StazOn ink Jet Black, bits and pieces of the wonderful new Lynne Perrella stamp sets LPC032, LPC033 and LPC034.

LPC032
LPC033
LPC034
I created some blue accents here and there on the stamped images with some watered down Fresco paint Glass Blue...

... and did the same with Zesty Zing

 I glued the backs of the pages together and sponged the edges with black ink. The pages are ready !


I added a very tiny ,Fleur de Lis' onto one of the leaves. To create the cover, I painted the two metal leaves (both sides), two jump rings and a small metal key with Fresco paints Blue glass and Hey Pesto, and let dry well.

I punched two holes into the leaves and into the pages and attached the jump rings.

To finish, I added the small key with a piece of ribbon and created a shiny look with a thin layer of Treasure Gold Spanish Topaz.


I hope you like my tiny book , in Miniature Art ! Give it a try yourself and have fun !
See you next time.

Liesbeth

Oh Liesbeth this is just stunning, so perfect in every way. I adore tiny trinkets like this, and your finishing touches make this very special. Just look how tiny this is next to the tools.. So inspiring that even though you are working so small the attention to detail is still there, probably even more so than usual. Great to see painting techniques used on larger pieces can still be used on smaller projects. Thankyou ~ Darcy

We would love you to join in with challenge #4: Miniature Art. If you are inspired by any of our guests who blog with us over the fortnight, then please join in and link up your creativity HERE

All links go in the draw to win a voucher to spend on products of your choice from the PaperArtsy online store. The Fresco Paints link will close 17:00 (London Time) Sunday, March 8th, winner will be announced 2 hours later at 19:00.

Wednesday, 25 February 2015

2015 #4 Miniature Wearable Book! {by Keren Baker}

2015 Topic 4: Miniature Art

Hi everyone Keren here, joining you this evening with a post about creating miniature wearable art. I love creating detail on projects decided to make a useful piece of art that you can both wear plus use to jot down last minutes notes or a phone number! I wanted to re-purpose some bamboo tiles I'd held onto for years!


To create this- I gathered together some Nougat Fresco paint and the Lynne Perrella sets LPCO32 & LPCO34. The smaller images are perfect for this project.

I painted a couple of layers of Nougat which is a brilliant skin tone colour and if you paint it as the base layer, it's easy to add the colour on top. In order to create the mini book, you need the flatter side as the inside to stick your pages too, so the outside needs to be the slightly curved side. Stamping onto a curved surface is more challenging. I put the stamp to the tile & by using the Flexi Blocks you have much better control.

Now it's just a case of painting all the details on the face- you need a tiny brush & used a variety of opaque and translucent colours so I can add layers of paint on top of each other. Here's the colours I used;

Gorgeous aren't they?! I've used some of the brand new colours which are simply beautiful. Once painted leave to dry well as you're going to need to manipulate the tile a little when sticking the pages into it.. and trust me, you aren't going to want it to smudge ;-)

Next. onto the mini-book bit- apart from simple copier paper and thread, these are the extra supplies I used.

Now you need to cut a piece of cardstock that is the same size as the tile and also some folded pieces of paper the same size too.

Add six little dots in the centre of the folded pieces, prick each one through, stack all the folded pieces and then backstitch through all the pages. Stamp and decorate some of the pages.

Then add a folded piece of cardstock a little smaller than the pages and use this to glue to the bamboo tile and the back piece of cardstock.

And that's it! Leave to dry under a slight weight. Thread the wire through, twist, add beads and a jump ring. Thread some sort of ties or necklace to complete it.

I'd love to see what you create. If you can't find bamboo tiles - ordinary dominoes would do perfectly. You might find it easier to sand each domino down first before adding the paint. 

To attach a jump ring, you can find flat back connectors at jewellery finding suppliers.

If you wanted to make it more long-lasting, simply add one of PaperArtsy's glazes onto the front and back. It doesn't need to be a necklace- you could create a gift of several mini notebooks in a small box or even fashion a fabric bag to add the notebook into when it's in your bag. Do have fun making miniature art- it's wonderfully absorbing and takes such little time. Plus, you never have worry about what to fill that leftover bit of space on your project- because there's so little space to fill ;-)

xx

Keren Baker
Twitter: @craftstampink

Ohhh how cute Keren. I have a domino necklace, but not a bamboo one with a book in it!!! The bamboo tiles are lighter too, and the drilled hole is handy too, I remember getting Mr PA to drill my dominoes for me so i could wear them, does require a bit of clamping.

We would love you to join in with challenge #4: Miniature Art. If you are inspired by any of our guests who blog with us over the fortnight, then please join in and link up your creativity HERE

All links go in the draw to win a voucher to spend on products of your choice from the PaperArtsy online store. The Mini Art link will close 17:00 (London Time) Sunday, March 8th, winner will be announced 2 hours later at 19:00.

Monday, 23 February 2015

2015 #4 Stars and Moonlight Peg Doll {By Julie Ann Lee}

 2015 Theme Four: Minature Art

Hi everyone! It's Julie Ann here from Magpieheaven. I'm thrilled to be at PaperArtsy again using Sara Nauman's magical stamp plate ESN13 with Shrink Plastic. The current theme, so brilliantly introduced by Leandra last night, is Miniature Art, and what could be better when you're working in miniature than to have a material that shrinks down to create perfectly co-ordinated embellishments?


Step One:
I began by lightly sanding a sheet of Shrink Plastic with horizontal and then vertical lines to give it some extra 'tooth'. I then painted with a slightly watered down coat of the new Blue Oyster Fresco Finish paint. This was the ideal colour for the project. Often the lighter shades of fresco paint dry darker than they look wet, so check the label for the true colour. Blue Oyster looks gorgeous. 

TIP: I've found that you have to get the consistency of the paint right with Shrink Plastic - too thick and it could flake off! Don't be shy to add a few squirts of water from a mini-mister to thin down your paint before you apply it to the shrink plastic. 

Step Two:
In the photo below, you can see how I used PaperArtsy dies to cut the shapes I wanted to embellish my peg doll. I cut out several to play around with - the moth, the songbird, the heart and a leaf from a flower die - any I don't use I can keep for future projects. At this stage you should also punch any holes you're going to need to attach your shrink. I didn't need them for this project so I was ready to stamp once my plastic was cut to shape.


Step Three:
I stamped the book text star from ESN13 onto some more of the Shrink Plastic and then cut carefully around the impression with precision scissors. Once the plastic has been coated with a layer of Fresco Paints you don't have to use StazOn ink on the shrink any more because you have coated the plastic with chalk paint. As you know, it's always best on chalk paint to use archival ink, but Brilliance black Pigment ink is also suitable. It seems with frescos they are not fussy about which ink you use - the stamping always comes out beautifully, even with oily inks designed for fine detail. I find the best way to stamp onto Shrink Plastic is to lay your piece paint side down onto the inked stamp and press in gentle circular movements. You will be able to see the stamping through the plastic when it is ready to lift off.

TIP: If you need to cut out a stamped image, waft your heat gun very gently over the shrink to dry the ink without actually shrinking the plastic. You will see the ink lose its shine as it dries. Let it cool and touch test before you start cutting...you don't want black fingerprints everywhere!


Step Four:
The fun begins! I like to use a heat-tool to shrink my shapes so that I can see them transformed before my eyes! It's a good idea to use a pair of tweezers or a wooden skewer laid across the item is good too, either will keep your little pieces from flying away, and the skewer tend to help prevent the item curling up on itself! Stay calm if your shapes seem to be curling in on themselves - they will always flatten out and you can turn them over gently and just apply a little pressure with an acrylic block to give them that final flattening!

TIP: Did you know the shrink 'follows' the heat gun, so if a bit curls in, put the heat gun on the opposite side, and it will curl back towards the heat!


Step Five: 
And here are the tiny details ready to be fixed to your finished project. I loved how Sara's script from ESN13 came out so prettily on the bird and how the sentiment from the same plate fitted onto the leaf shape to the right.

ESN13
 

Step Six: 
All that was left now was to fix the Shrink Plastic embellishments to the peg. I find that a blob of Heavy Gel Medium does this perfectly, as long as you wait overnight for it to dry. Otherwise any strong glue of your choice that dries clear should be fine.


I love having this option to miniaturize a favourite stamp and co-ordinate the colours of a project. Why not have a go and link up to PaperArtsy using Shrink Plastic on 'altered' wooden pegs, spoons, memo boards - what you will - reach for the stars!


Have fun and - remember - if you want to see instructions on how I decorated the whole peg, just pop over to my blog Magpieheaven

Julie Ann x

We love how you have created your Peg Doll Julie Ann, a perfect introduction and inspiration to our new theme. Shrink Plastic lends itself beautifully to your project, the shrunken star looks fab as does your whimsical face. Thank you :)

We would love you to join in with challenge #4: Minature Art. If you are inspired by any of our guests who blog with us over the fortnight, then please join in and link up your creativity HERE

All links go in the draw to win a voucher to spend on products of your choice from the PaperArtsy online store. The Minature Art link will close 17:00 (London Time) Sunday, March 8th, winner will be announced 2 hours later at 19:00.

Sunday, 22 February 2015

2015 Topic 4: Miniature Art {Challenge}

Topic 4: Miniature Art

Coming up over the next 2 weeks we are talking tiny, mini, miniature, diddy, tiny or perhaps you call them wee things. There are many words in the English language for 'small'. So what comes to mind for you? This??

Well here's just a few ideas in the video intro...but of course, there are loads more below, and about a zillion more in your crazy heads...let's do this! Mini makes....


Before we go into the next topic in depth .... let's see who the winner of the last challenge was. Plenty of you showed us the huge array of things you can do with paint, it really has to be THE most versatile colouring option out there for crafters! Fantastic ideas from you all, thanks for joining in.... over to the challenge boss....

Hi everyone, Darcy here. 
Wow! The Paint challenge was great. So many awesome ideas yet again. You guys are such an inspiration to watch at work. Thankyou for sharing with us. As you know, the last few weeks at PA HQ have been extremely busy with the new PA product launch, and a bunch of us went to the UK annual trade show last Saturday through Tuesday, affectionately know as 'stitches'. It's the UK's CHA equivalent, and a great chance for the shops to come, see what new releases manufacturers have for 2015, and place their orders. PaperArtsy had a fabulous show, and of course, their chalk paint has been such a big hit as they now move into year 5 of Fresco Chalk Acrylics....so shall we see who the paint challenge winner is??? 
And the winning name from Topic 2...goes to Margaret B from Marglovecrafting

 To claim your £50 voucher, please email me, Darcy with your details to darcydotneedles@hotmail.com and I'll explain how you claim your prize. 


Ok, so it's Leandra back, and as you now know, the next topic is Miniature Art.

Sometimes I find doing things on a small scale is less daunting. But it can also make you assess your composition, layout, and embellishments more closely...there is not much space, and to make an impact, perhaps you have to put a bit more thought into it? Too complicated and you lose the impact, too minimal, and it might still look bare. Resolving these things really appeals to me. Colours contrasting, texture, what will the focal point be...all things that you have to fit in a smaller space than normal. Are you up for this?

Sometimes you can be sneaky, and make a small thing seem bigger on the inside...like this accordion style domino book...

But then again, you can stick the pages together and just embrace the tiny pages...

I think my favourite thing on the mini scale is domino art. I was addicted to this about 21 years ago! In fact, my first article in Craft Stamper Magazine was showing how to decorate a domino. We used to go to shows and swap them with other 'altered art' people. In the video, you can see a gorgeous mini domino book that my dear friend in New Zealand, Irene (she taught me everything) gave me. Its a gem, and it sits on a shelf above my desk so I can look at it and remember her, and how I got started in crafting.

Here is an amazing example of domino art. So intricate! Love the bead-feet!

I found this beautiful example below (the accordion pages above are the inside of it), there is a tutorial here on how to do it.  So pretty with the beads as feet too!

This one below is for sale here, there are some other stunning examples that might inspire you to have a go. We always would sand a domino to give it some tooth first, then a coat of fresco and you are on your way. I love the idea of using this as a super-mini canvas! Can you do it?

If you get the really tiny dominoes you could make earrings...

Or keep it simple like this option...

What about Shrink plastic??...very much a marmite product...you love it or hate it! I love these books. Here the link to a tutorial..

When you see the gorgeous bracelet Lin Brown made a few years back, perhaps you'll think again. Lin made this.. 

Lin started with a very light coating of watery snowflake before she stamped the images made life easy, then she added colour. I think if you make a shrink bracelet, you need to fill it up so it looks busy. I love how Lin added layers, pearl beads, and sometimes more than one item on a jump ring. Makes it really interesting! Instructions are here.

Here is another example, and I really like how the 2 layers add interest, one popping off the other. Its not complicated, but the vivid orange pops off the B&W background. Ohh I need one in every colour option! Instructions here.

The problem with jewellery items is always coating/ sealing them with the right product that stays crisp and shiny when you wear it over and over....and even waterproof! Over time, glossy accents seems to dull. That and it's predecessor, Judikins Diamond Glaze were our go-to option back in the day for dominos. 

UTEE (Ultra Thick Embossing Enamel) also scratches up when worn, but you can zap it with a hit tool back to brilliant and shiny if you are careful. Ohhh we might see some more of those Leandra beads! 

The fondue UTEE technique is so much fun! (keep saying i MUST do a video on that!) Here's what Nicole did to make one into a bookmark!

Of course UTEE can be used in a bout a zillion ways, just run a google for Suze Weinburg, she's the UTEE guru and genius with the mostest! There is lots of info on her blog...like how to do these...

I will never forget when Tammy Tutterow started into melt art, she was dipping all kinds of stuff, and I love this example here, tissue flowers...just gorgeous...think of the ways you could take this...It's get-your-melt-pots-out time people!!

OK, so there's a cazillion things you can do with moulds, clay, UTEE, resin.... and look...it's a perfect time for Treasure Gold Tickles!

These days hard-setting resins (eg Ice Resin) are incredibly user-friendly. Perhaps resin is the best answer for sealing jewellery bits and bobs? 

I guess you guys will show us how you seal things for jewellery this week....let's face it...all jewellery counts a miniature art! And you can makes some stunning things with paper, resin, clay, beads.... ohhhh getting excited to see that!

Pocket scrapbooking is smaller than 12x12 layouts, so that's mini art, isn't it? This one is lots of layers, with a simple 'bind-it-all' binding...wonder where my machine is hanging out...

This one in a more formal folder, but hey, it's a mini album! It counts!

What about coin envelope books/ pages...that was a huge thing, paper bag books too! Details here.

This looks like fun too. Check out how its done here.

When we go to France every year they talk endlessly about Mini albums....The French do love to make a mini album, or flick book. So that counts! In fact, we are over there April 10/11/12, and Jo Firth-Young is even teaching a mini book class! Check it out if you need an excuse to go to Paris!!! (like anyone needs an excuse to go there!!)

Here's a mini album to hold inspirational quotes! yes really!

And this one is using recycled materials...ohhhhh nice!

I remember when we used to alter childrens' board books...they could be termed mini art too. We used to sand they gloss layer off, then gesso. But now you can attack with the frescos and your are on your way. Kind of like journalling on a hard surface... Check out this gorgeous example by Veronica Funk.

What about tag books...they are a mini kind of book thing. In fact, it's fun to take one of our huge tags, and make that into a book cover, then make a signature of pages to go within....that's a diddy book!

Inchie books!!! Adorable...

How cute is this button book!

Mini houses, I adore houses. This is fabulous, its an altoid tin. See more here...

And what about this village on a rock!!! ...

 And a mini canvas, also very classic, elegant and just beautiful!

Don't forget soldering, microscope slides, old fashioned photographic slides (eg kodak), mini fabric books, how about mini niches or canvases...or turning a chunky canvas over and using the tiny niche on the back?? Oh boy...so much to explore!

Ok, enough already I hear you shout, ideas for a year, let alone 2 weeks, but whatever you choose to do, I do hope you make time to enjoy the process. 
Come and play with us!

Don't rush it, we are all here to contemplate, enjoy, explore and learn from each other. It's not a race, it's a process. Your time to escape from the boring part of the week into your much more exciting creative zone. 


Reminder: we are exhibiting at Stamperama on Sunday, March 1st, 10-4. Lin Brown will be demoing with me, and there will be lots of PA twits to chat with, so come and say hi, and touch all our new products. You might see something you might like to buy too! It's happening at the Stevenage Arts and Leisure Centre, Lytton Way, Stevenage. Not far up the A1(M), and the train station is VERY close. Hope to see you there!

Have a great fortnight!
Leandra 

We would love you to join in with challenge #4: Miniature Art. If you are inspired by any of our guests who blog with us over the next 2 weeks, then please join in and link up your creativity to this page.

All links go in the draw to win a voucher to spend on products of your choice from the PaperArtsy online store. This link is open from Sunday Feb 22nd and will close 17:00 (London Time) Sunday, March 8th, 2015. The winner will be announced 2 hours later at 19:00.</>


Challenge Guidelines:


1. The challenge is a chance for you to show how you have been inspired by a particular technique of the fortnight. Your entry should contain:
- a mention of which post inspired you and why, and 
- a link in your blog post to that original post on the PA blog.

The whole concept of this challenge is 'play along with us'. You are encouraged to put your own twist on ideas you see on our blog, don't feel obliged to copy an idea exactly, but if you prefer to replicate, of course that is fine too. We love to see how you are inspired!


2. The link you put on our linky page must lead directly to the specific post on your blog where you have explored the technique/ idea mentioned in point 1 above. Don't link to the home page of your blog, or we will be unable to find the post to leave you comments.

3. Spam links will be deleted.

4. We prefer your challenge post is created exclusive to our challenge. Multiple challenge links in one blog post often creates a conflict of interest between the different challenge hosts.

5. You are most welcome to use stamps/ products/ substrates you have to hand from a variety of companies, we do not expect you to exclusively use PA products - but of course it's lovely when you do!

6. You can enter as many times as you like in the fortnight. We don't want to restrict your creativity or participation! Link closes at 17:00 Sunday March 8th.

7. The winner of the random draw will receive a £50 credit to be redeemed on the PaperArtsy Website, the credit includes VAT and postage. We request that one of your purchases is an A5 rubber stamp. You can add any other items to your basket, but the final total should not exceed £50

8. Each Sunday fortnight the winner will be announced at 19:00, also, in the same post, the link for the next fortnight will be posted. It's your responsibility to claim your prize coupon from Darcy: email her darcydotneedles@hotmail.com


Good Luck! If you have any questions, don't hesitate to ask!