I
started with two little wooden boxes and painted them both with Vanilla. I
painted them inside and outside before sanding lightly to get a nice smooth
surface. I then painted the outside again. The insides of the boxes can be
left painted or another option I like is to line them with pretty paper.
I then added some
colour by applying it with wet wipes. Dab a little colour on randomly and
bounce the wet wipe over the surface of the paint to spread it out and make it
look mottled. To start with this looks messy and horrible but after using more
colours it starts to look almost like marble. On the smaller box I started
with Cinnamon but I omitted this colour on the larger box because I wanted a
slightly lighter finish. I find that it is best to dry the paint between
layers but don’t add the next layer of paint until the surface is cool or the
paint dries before it can be spread around.The next colour is Pumpkin Soup (this was the first colour for the larger box). Again apply randomly. This
picture shows the smaller box up to this stage.
The
next colour is Brown Shed and finally I used a little Eggplant in places to
deepen the overall colour. I often find that I need to go back and repeat at
least some of the colours again to get the right effect and for the smaller box
I added quite a bit more colour to achieve a darker overall effect. Here you
can see the two boxes which are different in the depth of colour.
I
mixed a deep plum colour to paint the edges of the smaller box – a mix
of Brown Shed and Eggplant. When all the paint is dry I applied a coat of
Satin Glaze just because I wanted a slightly shiny look, but you could omit
this if you prefer. A glaze with a slight shine like satin can add real depth to the colour, rather than a matte finish which is much flatter.
I
then stamped and embossed the trailing ivy from EEB01 onto the larger box.
This was quite random and I also stamped over the sides of the box. I used a
plum coloured embossing powder. The smaller box was stamped and embossed using
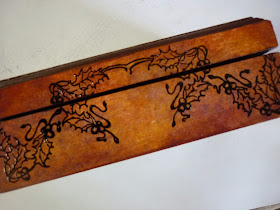
black embossing powder. I used the ivy from EEB02 on the top and the holly
also from EEB02 around the sides.
Next
I stamped two fairies from the EEB01 and EEB02 stamp sets and coloured them with various paints. I find that if I mix the paints with Matt Medium they are more transparent
and tend not to obscure the lines of the stamped images. I then stuck the faces onto circles
of thick card. Finally I rolled the edges of the discs over perfect medium
before rolling them in embossing powder and heating to give an embossed edge.
To
finish the boxes I stuck lace over the boxes; for the larger box I stuck the lace
right down over the sides and when the glue was dry I cut the lace between the
lid and the base. The fairy images were then adhered to the box lids as shown
and a few final floral embellishments were added.
That’s all for tonight folks. I shall be back again tomorrow with a final project for this month .
~Liz~
A huge thanks from all at PaperArtsy HQ Liz for another fantastic project ... the warm rich tones work beautifully with your new designs, the combination of embossing and lace add such an elegant touch to these boxes.
We would love you to join in with our monthly challenge. If
you are inspired by any of this month's guests who have blogged between Sept
1st 2014 and Sept 30th 2014 then join in
and link up your creativity HERE. You will go in the draw to win a voucher to
spend on products of your choice from the PaperArtsy online store. You need to
add your link by 19:00 (London time) Sept
30th 2014


the boxes are really pretty, Liz! Love the rich autumnal shades.
ReplyDeleteVery rich in colour, really reminds me of Christmas, lovely xx
ReplyDeleteStunning and I think the nicest Autumnal project I have seen. Loving these stamps.
ReplyDeleteJulie x
wonderful depth of colour - these stamps are beautiful xx
ReplyDeleteStunning! Cannot wait to get home and play xx
ReplyDeleteBeautiful boxes!!!
ReplyDeleteWonderful techniques you have used on these two boxes Elizabeth with such pretty results. They almost look as though you varnished them!
ReplyDeleteHugs
Lesley Xx
Such a glossy finish! Both the boxes look beautiful.
ReplyDeleteThis is gorgeous. Love the vintage look. Thanks for showing Anneke.
ReplyDeleteGorgeous boxes! Lovely your images and fab vintage colours. xx
ReplyDeleteThey are VERY pretty. I love the rich colours.
ReplyDeleteThese are both gorgeous!
ReplyDeleteWow wow absolutely gorgeous stunning box, the colours are amazing and your stamps are gorgeous. Happy Creating ☺ Kezzy xxx
ReplyDelete