Hi there everyone! I'm Linda Cain, and I'm back for another PaperArtsy project!!! I love it here! Such an eclectic group of fun and talented people to play with.
The Birds are going crazy in our garden with all the rain and prospects of worms to grub around with. And if you've known me for very long, you know that houses, be they bird or otherwise, are one of my passions.
I started with a plain wooden birdhouse that I did my best to sand and make smooth. Then I picked 3 bright, light, and opaque colours to base coat sections of the house. This just shows the testing of whether I liked the colour combo or not. It proved to be a "go."
Here I chose Lilac, Guacamole, and Bora Bora. I used 2 coats to get good coverage.
I added the Crackle Glaze to the blue sections, and when dry, painted on the darker colour Inky Pool. I LOVE the way it crackled!!! I also used a sanding block to take paint off the edges for a more Shabby Chic look. Next I added Eggplant with a dry brush and a sponge to the edges of the Lilac painted areas. It was a bit harsh here, so I sanded it back as well.
I mixed up some Guacamole and Grunge Paste to use with the Lin Brown stencil PS002 on both roofs.
I used the JOFY09 stamp set shown here on the top with olive green archival ink.
 |
| JOFY09 |
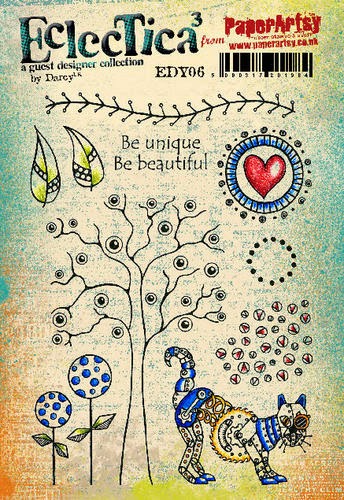
Then I rummaged through all my Darcy stamps EDY05, EDY06, EDY07 and EDY08 for just the right size stamps to fit into each little area of the house on the bottom section.
 |
| EDY05 |
 |
| EDY06 |
Bubbles, Leaves, Butterflies, Flowers....whatever will fit into the area you have. Don't ya love the round stamp that fit around the holes??? Too cute!
 |
| EDY07 |
 |
| EDY08 |
Here's the best tip I can give you: Cut a piece of left-over plastic packaging to a size that will fit into the area you want to stamp. Use it to stamp your stamps instead of an acrylic block. It lets you get a nice clean stamped image in a tight spot.
The other thing I did was to trim my stencil to fit on the lower roof. Taping it into place was much easier this way.
After everything is stamped up with different colours of archival inks, go back and either paint (I used a bit of Haystack and Claret) or use permanent markers to add more colour.
 |
| EM03 |
 |
| EM05. |
I used Black, Red, Blue and Olive Green Archival inks because once dry they are permanent, this means I can spray this with a sealer, drill a hole in the top to add a piece of twine through, and hang this little house in a tree out back.
That's it for me for today. Hope you get some inspiration to make a little birdhouse of your own. They really are fun, easy, and the birds will love you.
Your Friend in ART,
Linda
Huge thanks to Linda From PaperArtsy, this is such a delightful project. cheerful and quirky, what little birdie could resist. Great tips on how to work in awkward to reach areas too.
If you would like to join in our weekly challenge with any of this week's guests who have blogged since Sunday night, then join in to link up your creativity HERE you will go in the draw to win PA stamps of your choice! You need to link your entry by17:00 (London time) Sunday 3rd Aug 2014


It is gorgeous, Linda!! love the colours, and your trick to stamp on some plastic packaging is a great idea.
ReplyDeleteLove the crackling, love the sanding, love the colours, love the stamp that fits around the circular hole. It's just a feast of loveliness. Don't have a double-decker birdhouse but it certainly has me thinking. Xx
ReplyDeleteWhat a glorious piece of whimsy! I love the colours and the beautiful designs on this pretty, double-decker birdhouse! Julie Ann xxx
ReplyDeleteI love this piece! The JoFY & Darcy stamps work brilliantly together with this project and nice mix of techniques too.
ReplyDeleteHugs
Lesley Xx
Great quirky and arty project, some fab ideas for decoration too !
ReplyDeleteThis is glorious, Linda, and such fun! I love it when you're 'in da house'!
ReplyDeleteLucy x