Pages

Thursday, 31 July 2014

Scrapbook- Journal page {with Hot picks Stamps by Brenda Brown}

Hi Everyone Brenda here. I am really pleased to guesting again at PaperArtsy tonight. When Darcy asked me a few weeks ago what I was making I told her it would be something around ‘scrapping in my journal’ as I wanted to use the really zingy colours in the Fresco Finish range with photographs. This is not quite how I imagined it then, but I am pleased with the fabulous bright background mixed with my more normal vintage style. I think it has worked really well.

This is a double page spread using old family photos (yes of me!!!!)


Cut two pages using the heavy smoothy card and using low tack tape secured them together. Cover both pages with a layer of gesso to seal the card. I then rubbed London Bus, Tango and Zesty Zing Fresco Finish paints over the page with a few mists of water
and a wet babywipe to help blend them. Heat dry.

Then spray with Goosebumps to create some texture and again heat dry. I then used two of my spare spray bottles and mixed a watery London Bus in one and in the other Zesty Zing and sprayed over the pages heat drying between each colour. Lastly I finished with a couple of sprays of White Linen Dylusions ink spray.


 Before moving on I stamped using coffee archival ink with Hot Picks 1301

Hot Picks 1301
Collect together some strips of hessian, canvas, card, and lace to create some textures, I also diecut some of the PaperArtsy Chatsworth paper using the Tim Holtz Courtyard frameworks die. Again I used the Fresco Finish paint sprays to blend the colours. To help create the vintage look I was looking for I gathered some rusted elements together (I usually make a batch of different things and keep them in a box ready to use). All the card elements were sprayed with the FF paints and the words had London Bus painted on the card first.

The next stage is to ink the edges of the card elements and the photographs, again to help create that aged feel to the pages. I adhered these with the strips of hessian over the tissue tape and before I finished assembling I added some dylusions cherry pie to the London Bus mister to deepen the colour a bit and sprayed in three places, letting the red be absorbed and drip a little bit. This was then heat dried. I forgot to photo that stage but here is a close up after I had finished. I also added some splatters of walnut crystal ink,


The last stage is to cut through the pieces that were overlapped across both pages and use the cropodile to make the ring holes. Then I added butterflies and journalling words that I print out myself.


Thanks for taking a look at my pages. I have a slightly longer version on my blog if you would like to see more.
Enjoy your crafting time this week.
Brenda xx

A huge thanks to Brenda from PaperArtsy HQ. This is such a great idea, to tape the pages together and work on them as a whole until the end. We love the depth and richness created by layering the watery,spray fresco over the more solid frescos underneath. Spraying your embellishments with the same colours has really created continuity across the pages. 

If you would like to join in our weekly challenge with any of this week's guests who have blogged since Sunday night, then join in to link up your creativity HERE you will go in the draw to win PA stamps of your choice! You need to link your entry by17:00 (London time) Sunday 3rd Aug 2014

Wednesday, 30 July 2014

Birdhouse {with JoFY and Eclectica³ Darcy Stamps by Linda Cain}

Hi there everyone! I'm Linda Cain, and I'm back for another PaperArtsy project!!! I love it here! Such an eclectic group of fun and talented people to play with.

The Birds are going crazy in our garden with all the rain and prospects of worms to grub around with. And if you've known me for very long, you know that houses, be they bird or otherwise, are one of my passions. 


I started with a plain wooden birdhouse that I did my best to sand and make smooth. Then I picked 3 bright, light, and opaque colours to base coat sections of the house. This just shows the testing of whether I liked the colour combo or not. It proved to be a "go."

Here I chose Lilac, Guacamole, and Bora Bora. I used 2 coats to get good coverage.

I added the Crackle Glaze to the blue sections, and when dry, painted on the darker colour Inky Pool. I LOVE the way it crackled!!! I also used a sanding block to take paint off the edges for a more Shabby Chic look. Next I added Eggplant with a dry brush and a sponge to the edges of the Lilac painted areas. It was a bit harsh here, so I sanded it back as well.

I mixed up some Guacamole and Grunge Paste to use with the Lin Brown stencil PS002 on both roofs.
  

I used the JOFY09 stamp set shown here on the top with olive green archival ink.

JOFY09
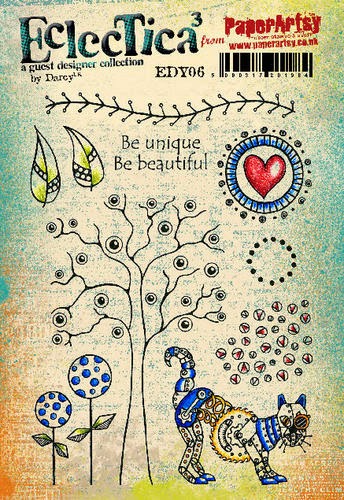
Then I rummaged through all my Darcy stamps  EDY05, EDY06, EDY07 and EDY08 for just the right size stamps to fit into each little area of the house on the bottom section.

EDY05
EDY06
Bubbles, Leaves, Butterflies, Flowers....whatever will fit into the area you have. Don't ya love the round stamp that fit around the holes??? Too cute!

EDY07
EDY08
Here's the best tip I can give you:  Cut a piece of left-over plastic packaging to a size that will fit into the area you want to stamp. Use it to stamp your stamps instead of an acrylic block. It lets you get a nice clean stamped image in a tight spot.


The other thing I did was to trim my stencil to fit on the lower roof. Taping it into place was much easier this way.


After everything is stamped up with different colours of archival inks, go back and either paint (I used a bit of Haystack and Claret) or use permanent markers to add more colour.

I also used some of Darcy's minis, EM03 and EM05. 

EM03
EM05. 
I used Black, Red, Blue and Olive Green Archival inks because once dry they are permanent, this means I can spray this with a sealer, drill a hole in the top to add a piece of twine through, and hang this little house in a tree out back.

That's it for me for today. Hope you get some inspiration to make a little birdhouse of your own. They really are fun, easy, and the birds will love you.

Your Friend in ART,

Linda

Huge thanks to Linda From PaperArtsy, this is such a delightful project. cheerful and quirky, what little birdie could resist. Great tips on how to work in awkward to reach areas too. 

If you would like to join in our weekly challenge with any of this week's guests who have blogged since Sunday night, then join in to link up your creativity HERE you will go in the draw to win PA stamps of your choice! You need to link your entry by17:00 (London time) Sunday 3rd Aug 2014

Tuesday, 29 July 2014

GD: Liesbeth Fidder Project #3 Scrap Notebook


"Hi everyone,  Liesbeth here. Sadly it has come to my final post as a PaperArtsy Guest Designer. The time has sure flown by".


Yesterday I promised to show what I made from a piece of beautiful painted paper, a left over from the wall hanging. Now by magic it's a small notebook .. a perfect gift don't you think!


Here's what I did - I stamped the shirt from LynnePerrella Collection 029 onto the left over Smoothy Heavy Weight White Stamping Card and also on a piece of white Shrink Plastic. For both I used Black StazOn Ink to stamp with, then I cut them out. 


I punched a hole at the top of the Shrink Plastic shirt and shrinked it with the heat tool, added a bit of colour with some Archival Inks and FrescoFinish Paint. For the cover and back of the notebook, I did the same "Peeled Paint technique" using petroleum gelly, as I did yesterday for the wall hanging. To make the pages, I stamped the shirt sevaral times onto a thin piece of printer paper, using light inks. I used Adirondack Cloudy Blue, Aqua and Sandal, I cut them out and sponged them a bit with Sandal. Next I punched a hole, added a swivel clasp and a tiny key as shown. I finished the notebook with a bit of Treasure Gold (Sapphire and Brass).


Some details ...and the finished notebook!


I really enjoyed being one of the Guest Designers for PaperArtsy, thanks a lot Leandra, it's been a very huge privilege and a big adventure to use your wonderful products! They are amazing and I hope I can do it again sometime.


Thanks very much to everyone who commented on my posts, I really enjoyed sharing my art with all of you! Hope you liked it. Can't wait to see what the next Guest Designers make!

Leandra Says: I adore the little shrunken shirt charm, another beautiful piece of art filled with textures and depth. It has been OUR pleasure having you as a Guest Designer this semester. Thank you. x

Gillian Says: Super use of the left overs Liesbeth, this would be an ideal last minute gift to have stashed away. Thank you so much for all your creativity, techniques and inspiration this semester, it has been a joy watching you create. x

If you would like to join in this week's challenge and play along with Liesbeth's techniques, then do link up your creativity here, and go in the draw to win some PA stamps of your choice! You need to link your entry by 17:00, Sunday August 3rd 2014.

Monday, 28 July 2014

GD: Liesbeth Fidder Project #2 Peeled Paint Hanging Board {Part 2}


"Hello everyone, it's Liesbeth again. Today we're going to finish the wall hanging we started yesterday". 


I cut a sheet of Smoothy Heavy Weight White Stamping Card in two pieces and painted one with Anarctic, Sky and Cheesecake Fresco Finish paint.


After drying, I stamped the large collage stamp from (Lynne Perrella Collection 030) on it with Black StazOn Ink  and cut out the eight images post stamp images I liked most. (Don't throw away the left overs!! 


Next I cut four pieces of Grey-White Board, Heavy, size 2,2 x 3,1 cm, the same size as the images. I cut out small segments as shown out of the top and the bottom to make it easy to insert screws later. 


I glued 2 stamped images onto each piece of board and added screws by using tacky glue. I also inserted some screws  at the bottom of the wall hanging.


I finished my home-made embellishments by painting the edges and screws with Cinnamon FrescoFinish Paint then I added some Treasure Gold (Brass and Sapphire) .. onto four small metal keys as well. I then assembled everything as shown.


Here are some details of the finished wall hanging.


I'm not a very stingy person, but as I "never" throw away a very beautiful left over scrap, I'm going to show you what I made from it tomorrow evening, I hope you'll join me again then!

Leandra Says: J'adore! Love the direction you have taken to finish off this hanging board Liesbeth, these postcard size images are just perfect.

Gillian Says: Love the addition of the hanging squares and the metal charm keys Liesbeth.


If you would like to join in this week's challenge and play along with Liesbeth's techniques, then do link up your creativity here, and go in the draw to win some PA stamps of your choice! You need to link your entry by 17:00, Sunday August 3rd 2014.