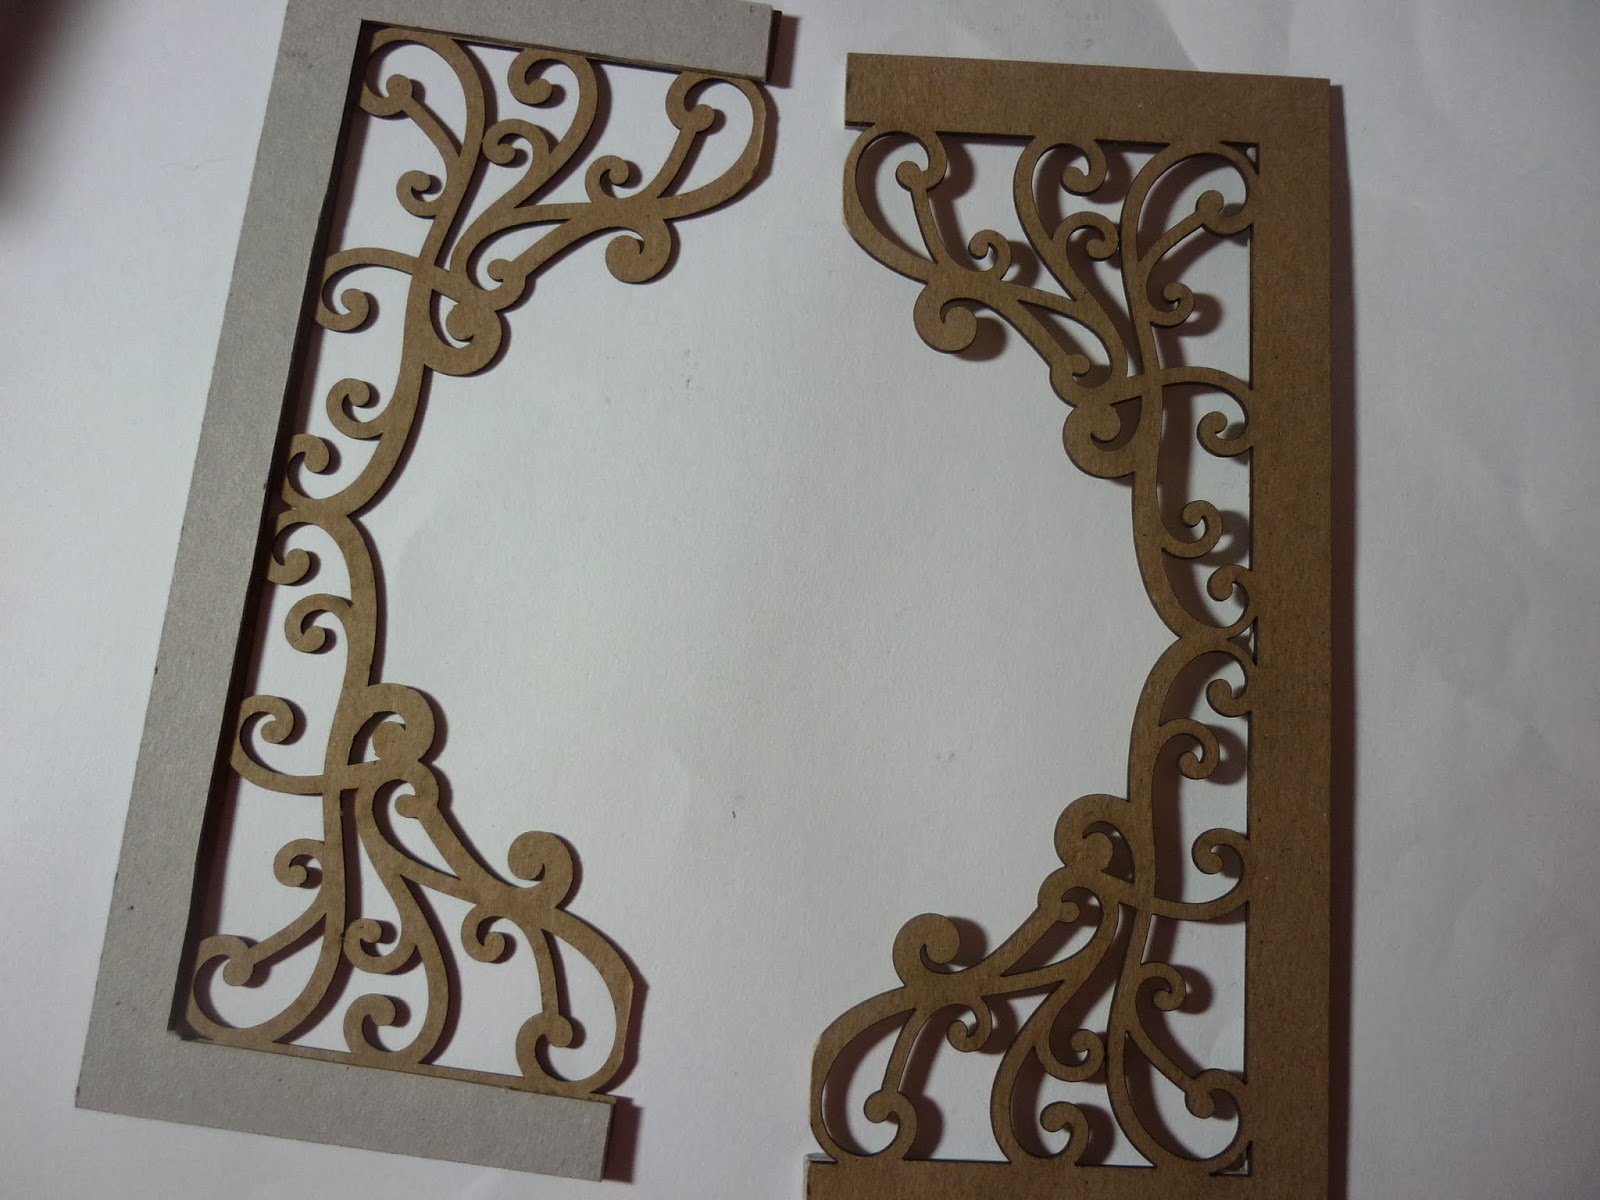
"When I started this project I decided to keep to a Halloween theme but I
wanted to use a different colour palette . I found a laser cut frame that was
supposed to be a book cover in my stash and it inspired me to make this project".
This is the book
cover which inspired me and which I cut into two pieces.
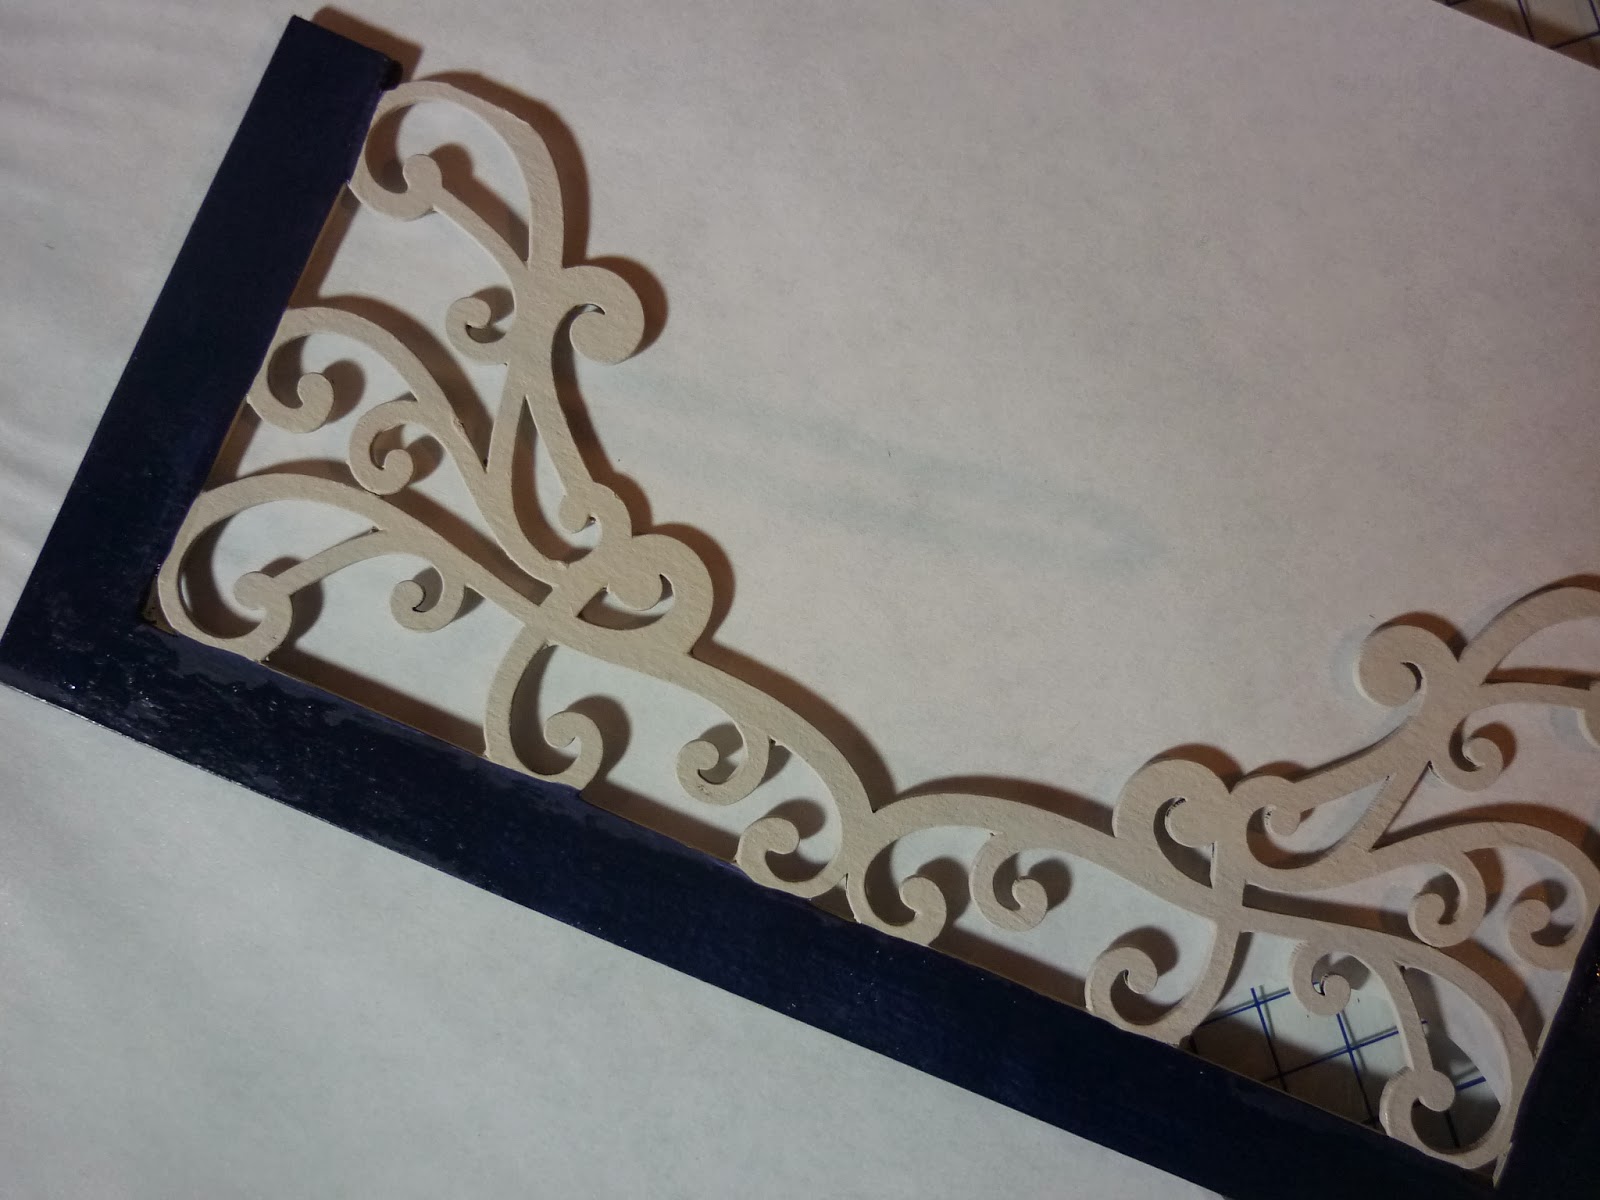
I used Grey Board to create a box the correct size for the cover but then I decided it
wasn’t big enough and that the cover would obscure most of what was inside so I
built the sides. I then cut Grey Board to cover the back and make a curved top
and also to reinforce the base. I also added grey board under the straight
edges of the book cover to support it.
I felt that the finished
surfaces were not very smooth so I
covered everything with good quality paper to create an even surface and
started painting it. I started with Space Cadet and Pansy. I painted with one
colour and then blended it with a wet wipe to get a mottled effect.
I continued with some darker colours – Peacoat andEggplant. I then wanted to create a lighter area so I used a small amount of
Nougat in the center.
I cut paper to fit the
inside of the aperture. To start with I had considered using this paper
because it looked like wood however I
changed my mind as I went along. I used stencils for leaves and skeleton trees
which I spread Grunge Paste over and dried.
I then started painting
the paper with a turquoise colour (Inky Pool). I painted with small amounts of
paint on the brush from top tp bottom to get a streaky effect.
I then added more colours, Eggplant, Peacoat and finally the dark blue mix.
I wanted a paler colour
in the middle so I blended a small amount of Nougat in.
I added a bit more Eggplant because it seemed to have got ‘lost’ in the dark blue.
The moon was stencilled using a circle cut out of paper. Using
Snowflake and a stencil brush with little paint on it dab in the moon fading
out towards the top.
Paint the book
cover with Stone paint and the edges with the dark blue mix . When dry spread Crackle Glaze onto the dark edges and when this is dry paint over with Stone.
Cut out the face
and a ‘body’ and paint a top in black. I made the wings by stamping bat wings from Eclectic Plate 6 onto parchment paper
and embossing with various colours. I cut out three wings and attached them to
the back of her body.
I used some spider web
ribbon to make the top. It wouldn’t stick with PVA glue so I spread Pinflair Glue over the whole of the top and
stuck it down. This made a rather nice effect because the glue dries shiny
which made a nice contrast. I neatened the top with a little black lace.
To make the
witch a hat I cut out circles of black
card which I embossed and then stuck together. I rubbed Treasure Gold over the
hat.
I stamped flowers
onto Smoothy White Stamping Card and embossed them all using black powder I wanted
them to stand out and not to loose the black when I painted them. I mixed
various shades of purple and blue using Eggplant, Peacoat, Inky Pool and Claret and painted the flowers. To add highlights I used an opaque white pen.
I then cut all the flowers out.( HP1006, HP1009, HP1010, HP1011 and HP1111. )
I made more
shrink plastic leaves from the oak leaf stamps HP1105 and coloured them in
shades of purple and blue .
I painted bottles black
and stamped and embossed with gold powder onto black tissue paper. I used
stamps from ID02 and just cut pieces small enough to fit onto the bottles. Fix
the tissue with Matte Medium.
To make the scroll I cut
one long and two shorter pieces of grunge paper. To make the edges ragged I
cut little pieces out of the long edges. I then rolled the small pieces up at a slight angle so that the edges
spiralled out and stuck them in place. When the small pieces were firmly stuck
I stuck one at the bottom of the scroll turning the bottom around the spiral so
that the end was hidden and I stuck one at the top in the same way. I painted the whole scroll with Stone
paint. I have tried stamping on a scroll
before sticking it together but it’s very difficult to get the correct
placement. So I stamped images from HPHW03 and embossed onto tissue paper, then stuck that onto the
scroll. I then dry brushed the edges of the scroll with dark blue
paint and rubbed Treasure Gold along the edges.
The metal flowers are from the
Finnabair Mechanical range which I painted black . The smaller one has a piece of
stamped and embossed tissue stuck in it. I stamped the eye design from PetalsPlate 2 and painted it before cutting it out to fit into the flower.
Finally, the owl was
stamped twice so that I could cut the top half off to make two layers. I then painted a stick
black and attached it to the base owl and attached the other piece over the top (HP1011 ).
Onwards are the finished piece.
I hope that you have enjoyed my
projects and I will be back again next month.
Leandra Says: Very , very, very cool. The layers are wicked! And the way you have pulled it all together - exceptional! Thanks Liz, your spooky projects this week have been superb!
Gillian Says: Words fail me Liz, this is absolutely BEAUTIFUL. Love Love Love the blue/purple colour hue to this project and the detail OH MY, fabulous way to end your week.


WOW WOW WOW that is absolutely BRILLIANT!! so much attention to detail and I love the colours you have used!!
ReplyDeleteOMGosh this is FANTASTIC, I think this has to be my favourite piece so far, it's absolutely brilliant
ReplyDeleteWay to go Liz
Sam xxx
Sensational work! Words fail me. I love everything about this project. You must be magic yourself!!! Wowzer! Julie Ann xxx
ReplyDeleteAbsolutely gorgeous!!! Like the others, I have no words...
ReplyDeleteAgree... gorgeous! Love the colours, the texture the Treasure Gold the shrink plastic leaves...
ReplyDeleteAgree... gorgeous! Love the colours, the texture the Treasure Gold the shrink plastic leaves...
ReplyDeleteStunning! Totally love the colours need to check which ones I'm missing lol
ReplyDeleteStunning! Totally love the colours need to check which ones I'm missing lol
ReplyDeleteOh I am blown away, I read the step by step instructions but when I saw the finished piece it was amazing! Jan
ReplyDeleteI'm on catch up again,just read through all your fabulous posts this week Liz and I'm kind of lost for words. All your projects are amazing but this one is outstanding. As you know, I'm really not a purple kinda girl at all, but the blue and purple look so good together, you have such a great eye for colour.
ReplyDeleteLin
Wow this is an amazing project! It is so detailed and I love all the blue and purple tones you have used. Claire x
ReplyDeleteSo much to look at fab colours which work so well AMAZING xx
ReplyDeleteOh my gosh! What a stunning piece!
ReplyDeleteI love the colors, textures, layers, and all the detail!
Wow!
Pinning!
Oh my word, this is amazing, I looked through your steps and when saw the finished results I am couldn't believe how you'd put it all together. definitely a project with the wow factor. love all the details and that you've made everything yourself. x
ReplyDeleteI'm with Gillian on this, words fail me too. 'Beautiful', 'gorgeous' & 'stunning' are completely inadequate for this incredible creation. I am utterly awestruck.
ReplyDeleteFantastic project! I love all the details, so much to look at!
ReplyDeleteBreathtaking!
ReplyDeleteThis is amazing! Love the colours you have chosen,
ReplyDeleteLucy x
Wow. just wow
ReplyDeleteOh wow, this is just fabulous! Amazing job with every little detail, and fantastic stamps used too. Thanks so much for the inspiration! :) hugs, Kimberly
ReplyDeleteI love everything about this project - so much detail to look - FANTASTIC ! xx
ReplyDeleteThat is just one superb creation, so dimensional !!
ReplyDeleteI'm lost for words and that doesn't happen often! It's a totally awesome creation!
ReplyDeleteHugs
Lesley Xx
OMG - that is FAB! So many layers and bits - I could look at it for hours and still find new bits. Wonderful project (and wonderful week), thank you!
ReplyDeleteI am totally amazed this project is outstanding. I love the colours you have used. Absolutely fantastical xx
ReplyDeleteThis was a sensational step by step culminating in a fantastic creation that is simply tremendously beautiful. I don't have the superlatives to express my awe for this. Stunning.
ReplyDeleteSoooo! Gorgeous!! It's a wonderful project. Thank you.
ReplyDeleteOh so stunning Liz!
ReplyDeleteUnique, spooktacular & breathtaking project Liz! Definitely has the WOW factor...
ReplyDeleteShame i don't own any of the PA stamps you have used as this project has made me realise how they could be used to such great effect.
You have an amazing and inspiring imagination ♥ :-)x
Absolutely fabulous, a stunning project Liz. Going back for another look, I am sure I will see more that I missed first time around. See you soon
ReplyDeleteSheelagh xx
A total WOW!
ReplyDeleteWowzer!!!
ReplyDeletexoxo Sioux
OMG A-MA-ZIN love it :)
ReplyDeleteHappy craftin
Rebecca
Speechless.... Just WOW WOW WOW !!!! thank you for this fabulous project and all the details, LOVE it !! Coco x
ReplyDeleteOMG..this is one of the best projects I've EVER seen. It is totally amazeballs....xxxx
ReplyDeleteWOW!!! This is stunning!!
ReplyDeleteTotally stunning - jawdroppingly beautiful, and so full of creativity and imagination - huge WOW from me!
ReplyDeleteAlison x
Holy Moly!!!! THisis totally AMAZING!!!!! I LOVE it!
ReplyDelete~Linda
OH MY GOODNESS WOMAN!!!! You have totally outdone yourself here with this incredible masterpiece. WOW! LOVE all textures, cuts, colors, embellishments, techniques.... ALL. Impeccable attention to details. LOVE every little element.
ReplyDeleteWow wow wow absolutely gorgeous stunning special creation, I'm speechless, truly inspirational :-) Kezzy xxx
ReplyDelete