Pages

Sunday, 31 May 2020

2020 #10 Topic Introduction: Recycled Packaging

 2020 Topic 10: Recycled Packaging


Hi everyone, Keren here with our latest (plus environmentally friendly) topic ; Recycled Packaging. We've all learned to be more intentional with how we dispose of our unwanted packaging, but how many of us actively use it in our art? There is very little that can't be used and there are increasing numbers of gadgets coming to market to help us make use of plastic and glass bottles. Artists have repurposed books and papers for many years and I'm looking forward to seeing what the PaperArtsy bloggers make of this topic.

'Recycling' some previous PaperArtsy designer's ideas here, I've chosen 3 from the past few years.

More recently you may remember seeing Kate Yetter's beautiful mail art piece that contains recycled PaperArtsy postcards that often come with orders!


Delving a little further back, Julie-Ann wrestled wonders from a packaging folder, making use of the wonderful corrugated texture so beautifully.

PaperArtsy Blog

Lastly, Anneke De Clerck created some joyous jam jar lid ornaments all ready for Christmas.


An obvious place to start is with junk journals. Fashioned from and decorated with what is seen by many as junk, it's the perfect place to jot your feelings or get organised. This example isn't so much about the decoration, it's the bare bones, all ready for embellishing.


Plastic bags have become words associated with so many negative connotations. Add some joy to them by trying this fused technique.


There is something warm and wonderfully textural about cardboard. This piece at a Children's Museum uses different techniques of treating cardboard. Love the trees and leaves.


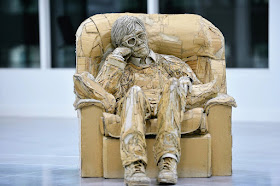
Staying on the theme of cardboard, the corrugated variety has a propensity to be mould-able. The artist, Warren King inspired from his cultural past, designed these life-size pieces. They are incredibly expressive despite the humble material they're fashioned from.


Our culture is trying to become one that recycles and moves away from a more disposable lifestyle. I've included this as I wouldn't have thought of recycling gift voucher packaging like this. The textures they've added are wonderful.


This next sculpture was created for a Spanish festival and was made from 6000 recycled tubes. The fascinating thing about this piece is how cleverly adding colour to the inside selected tubes really makes something special.


This is an ingenious take on a quilt block (one of the individual building pieces of a quilt) but using rolled up paper and magazine pages. We know that once paper is rolled, it has greater strength, so this would be a long lasting decor piece.


Here's a different take using corrugated cardboard. It looks almost metallic with the added inking and showing the corrugation in parts. This has been formed into a relief tile.


This bag was made in Mexico by prisoners using plastic bags that they wove and plaited together to earn money whilst in prison


With the world as it is, we are often looking for ideas for young children to make use of. The idea is simple, but I could imagine them being adapted for anyone's garden.


The humble matchbox is no stranger to being recycled. This is a fabulous example and could have lots of recycled elements for its decoration too.


With enough imagination, anything can be recycled, upcycled or simply turned into a wonderful piece of art. These vintage tins make for the perfect triplet bodies!


Perhaps you've got more grand ideas? This wall installation piece would certainly make a talking point in your home! The way it's sectioned into matching colours cleverly ties non-matching items together.


The ubiquitous box, found in everyone's possession is frequently discarded into the recycling bin. With a little imagination and love, you can create something decorative and special to house all those eclectic arty bits and pieces.


Many of us will smile wryly at the 'packaging' in question. Granted, it's not strictly packaging but is certainly one of the defining items of the Lockdown Era. Why not take it and transform it into something wonderful. These artistic 'loo-rolls' would look awesome anywhere!


Recycling the packaging needn't be the domain of just papercrafts. This tin has been sumptuously lined with velvet and stitched beautifully.


James Lake is known as one of the signature artists for using cardboard in sculptures. His work and artistry is breathtaking. This is a brilliant example of what he creates. Whilst you or I may not reach those dizzying heights, I've included it to inspire us to sculpt using this basic material that has so much potential.


These mixed-media ATCs were created using recycled packaging and there's a great video to show the process in the link. Whether you leave some of the substrate exposed to hint at its origin, or cover it entirely, they are often substantial and free bases that we should all make more use of in our art.


I hope this has got you delving into your recycling bins, seeing what treasures you might unearth!
If you want to create along with us, please share on our social feeds so we can see what you get up to. The best places are Instagram @paperartsy or post in PaperArtsy People Group on Facebook. Make sure you tag us in your contributions, we love to see what you get up to in your creative world!

Saturday, 30 May 2020

2020 #9 Reconstituted Flower with EKD {by Dounia Large}

2020 Topic 9: Collage It


There are so many inspiring ideas in this post. Dounia has some simply stunning ideas for incorporating magazine pages into your art. I also love her idea about when in doubt, add some white dots- I think that's the story of my creative process too!
~ Keren

Hi everyone, it's Dounia with you today, and I'd like to share with you some of my experiments with collaged papers.

I love collage: it was one of the first artistic techniques I practiced with my mom when little, so it brings back a lot of good memories. As I'm also currently separated from my paper stash, I decided to take the opportunity provided by this topic to create my own patterned papers and backgrounds.


Sometimes I find myself low on inspiration or really indecisive on what I want to achieve. I then like to turn toward techniques that focus on the process and motion of craft and required little "artistic" decision making. It gives me a sense of accomplishment without stressing about every little thing. I would like to share a couple of them with you here. They are nothing new or revolutionary but I think they can be fun additions to one's creative palette.

First, magazines are full of big pictures. They can be good or interesting - or not, but they rarely are easily useable as such. However you can chop them up then create a new image simply by rearranging the order of the pieces on a piece of card. The result is a lot more random than the original and can be used as a background without distracting from the main elements.


Regular stripes are the simplest to manage but you can change width or try different shapes for a more random pattern. I find the process of systematically cutting and glue-ing almost meditative and calming. I was in the mood for a striking pattern, and generally contrasted and/colorful images work best for that.


 .
Here I found the first glued images still too homogeneous and recognisable so I reiterated the process with lengthwise stripes. The colors are now better distributed and I like the tessellated pattern.

To contrast with this very organised background I next went on a tearing spree! I selected parts of magazine pictures with relatively plain colors and tore them in strips and pieces.  That part is pretty therapeutic! These touches of color can be used carefully to create new images, like painting with paper, but I was more into slapping them together to make gradients.


The color variations in the strips provide great texture. I often make too many pieces for one project so I put all the remaining ones in a box to draw blindly and glue. It forces me to release control and the results can be pretty interesting.

To make an actual project, I needed stamps able to stand up to such busy papers. I went for the clear lines and organic shapes of Kim Dellow. The EDK05 set had all I needed for a nature scene:


The leaves doubled as templates for petals cut in my collaged strips. I tried stamping on the front but it covered the color variations too much for my taste.


However I wanted to keep the details on the butterflies so I stamped them directly on pictures with interesting patterns.


Contrasted against the other elements, the leaf one won. I also liked the idea that both the petals and the butterfly were made of leaves!


For the flower centre, the big flower stamp was an obvious choice and the middle somewhat looks like an eye so I ran with that idea. I love collaging eyes, they're so recognisable and always make an impression.


I tried to match both the yellow green of the first butterfly and the eyes with this frog butterfly. The result was a bit plain so I added the vellum layers to isolate the elements and celebrate the graphics of the stamps. The white and black dots also really bring things together. When in doubt, add white dots!


Here is one project finished despite creative block, and I have lots of other backgrounds to play with! I hope this gave you a few ideas to try with magazine pictures. It's very cheap in both materials and tools needed and quite effective! It is also a great way to use those paper scraps we all are hoarding, or can be applied to book pages for very graphic results.

Have fun and stay creative!
Dounia x


Thursday, 28 May 2020

2020 #9 If only cats could talk with ECF {by Lynn Good}

2020 Topic 9: Collage It


Not only is it really good to hear Lynn's fur baby is on the mend, albeit looking somewhat like a shaved lamb, but also the vet scare along with a R&R boost from a Tracy class helped inspire this colourful journal page. It's funny how your mojo can come and go when you are faced with uncertain times, and I'm sure that Lynn isn't the only one at the moment looking for it to emerge!~ Keren, Leandra

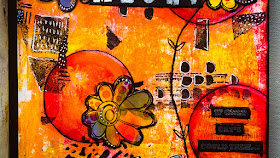
Hi everyone, it's Lynn Good (Memories on the Page) with you today, and I'd like to share with you an art journal page that I have created for the topic "Collage It"

I actually made two pages before this one, I personally didn't like either of them - they didn't feel right to me but I couldn't say why.  Even though my friends thought they were fine, I decided to take a break -  I was putting myself under pressure and forcing the design.  

I took a wonderful 2 day online class with Tracy Scott and it was just the medicine I needed. When taking a class or following a tutorial, a lot of the design, layout and topic is chosen for you - you end up with a positive attitude and a creative mojo back on your doorstep.

I was then in the right frame of mind to create this page.  My beautiful half Maine Coon furbaby was sick and had to be completely shaved (I will put some pics up at the bottom of the post). He was devastated as well as sick and it gave me the idea for this page.


I created this page in my Dylusions Journal.  After applying a coat of gesso I have covered the page with a brayer and PaperArtsy Fresco Finish Chalk paint in Tango, Banana and London Bus.


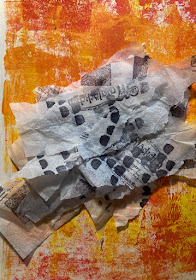
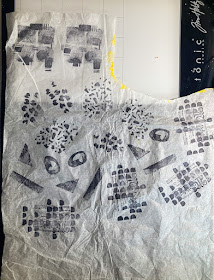
I have then stamped images from PaperArtsy Eclectica Courtney Franich set 12 (ECF12) onto tissue paper.


I have then torn them up randomly and adhered them to my page with matte medium


Once dry I have drawn circles on the page and coloured them with PaperArtsy Fresco Finish Chalk paint - Red Lipstick. (this was created at night so they will not be the best process photos sorry)


I wanted to create some flowers to go into the centres so I used a piece of PaperArtsy Smoothy Cardstock and painted randomly with  PaperArtsy Fresco Finish Chalk paint in Tango, Banana and Forget Me Not.  I have then used Paper Artsy Fresco Finish Chalk paint London Bus though a PaperArtsy Stencil PS001) for some more effect and to help join the colours together. 


Using this cardstock I have stamped and fussy cut flowers from PaperArtsy Stamp EKD06 You will note that these are not closely cut out as I find if I try to cut right up to the line I end up cutting off some detail!!!!  I have also used a Posca Pen and doodled around the stamped images on the tissue paper.


I have then stamped on black cardstock and cut out two cats (as we have two) from the Cat stamp set as well as two of the sayings.

Final touches to the page included of course adhering everything down - which I have done with Matte Medium.  I have drawn a string from the cat to one flower so it looks like he is holding a balloon.  I have outlined the flowers with a black Stabillo pencil which activates when wet, as well as some white marks on the flowers and I have highlighted the cats with white posca pen as the ink stamp was not as bright as I wanted.  I have mounted one of the cats with foam dots - there is always a "top cat" in the family!!!! 

Here are some close ups:


I hope that this has encouraged you to have a go at a collage art journal page - It is so much fun to put layer upon layer and watch it form into a completed piece.

As promised here is a before and after of my cat Buster.  He is on the mend - at 13 years old they thought his coat had so quickly deteriorated due to kidney failure but his bloods show he is very healthy and it is a mystery as to what happened.


Thanks for stopping by and I hope that if you get into that creative slump - remember you are not alone we have all been there and keep applying paint - you will get to the other side :) 

Lynn Good

Facebook:  http://memoriesonthepage.blogspot.com/