Pages

Saturday, 31 March 2018

2018 #5 Nautical Colours: Mini Book with Minis {by Sue Carrington}

 Topic 5:  Nautical Colours


Sue has created a delightful book with beautifully decorated covers, the colour scheme is so soothing, what a perfect holiday notebook this would make! ~ Leandra

Hi everyone, it's Sue here from Stamping Sue Style, and I'd like to share with you a project using the beautiful Nautical colour theme. These colours work so well together and the word 'nautical' also naturally brought to mind the idea to use nautical themed stamps as well.


I wanted to make something that was the optimum size for using the Mini stamps and decided on making covers for a small book which I would then bind. 


I've used White/Grey board for the covers and cut some watercolour paper down to size and made several signatures.


Following some Pinterest research on the colour scheme I gathered together assorted colours of Fresco Finish Acrylic paints -  Antartic; Lake Wanaka; Sage; Stone; Taupe. Pieces of book paper were glued to the covers and coated with glue, once dry the layers of paint were built up using a baby wipe. 


I used the 'bumping' technique with Kim Dellow's 036 stencil which worked really well, almost creating the impression of a wall. 


Before using the texture paste I stamped Mini 93 onto a Post It note and cut out the shape, not too close to the stamped image. 


The texture paste was spread over the cover and the Post It Note, which, when removed,  would leave a flat area to then stamp the image. While the paste was still wet some Art Stones were sprinkled on top.


The same techniques were used on the back cover, when the paste was dry I used a Pitt pen to add some shading around it. 


To bring it all together I used the Coptic binding stitch and added the text on the front from Alison Bomber's 08 set.

This colour theme is so beautiful it's worth stepping out of your comfort zone to give it a try even if you're a strong colour person. I loved making this little book, everything just seemed to click, especially the masking off with the Post It note. 

Sue

Blog: www.stampingsuestyle.com
Twitter:Ink_and_Me


We always hope that you  learn something interesting from our blog

Our creative team love to read your comments so much, so please take time to let them know you've been inspired!  

You must complete step 1 AND 2 to be entered into the draw. 

To join our challenge:
1. Leave a comment on the Topic Introduction Post and go in the draw to win a PaperArtsy Apron. 
2. Make something arty relevant to the topic, and link your creation from any social URL (eg. Instagram, Pinterest, Blog Post etc) sharing your original make to this challenge page.

The current topic link Topic 5: Nautical Colours will close 17:00 (London Time) Sunday, March 31st 2018, and the winner will be announced 2 hours later at 19:00.


All links go in the draw to win a PaperArtsy creative apron. Please make sure we can contact you as a prize winner - it helps if you share your contact info from the platform you opt to use.

Good Luck! If you have any questions, don't hesitate to ask!

Friday, 30 March 2018

2018 #5 Nautical Colours: Heart shaped plaque with EDY {by Ellie Knol}

 Topic 5:  Nautical Colours


Ellie has created another delightful project using a range of  found collage images and her stamps, and of course textures and other creative products. This plaque is so endearing, I love how she has pulled it all together so wonderfully! ~ Leandra

Hi everyone, it's Ellie Knol with you today, and I'd like to share with you the altering of a wooden heart that measures 19 x 20,5 centimeters.. 

I chose to do it in a heart shape as the stamp set has some heart shapes too, and to me those two seem to be in love; and nautical colors include red.


I did a lot of collaging, including some pictures I had in my stash.. they look like they have been drawn, perhaps with watercolors I think. I tried to collage them in such a way that it all blends in.  Why the sea? Well yes .... nautical has everything to do with the sea, of course.
 

The tree and heart shapes from the EDY20 have been stamped onto tissue paper, but the main images were stamped on cardstock and fussy cut.


I've made the fishing net myself, while enjoying a cup of coffee with my family this morning... first one.. I will need to do this more to get it more even, and use it in my crafting, but for now this will have to do, hehe. 


So, there you are, another way to create a mixed media project; a bit from me and a bit from Paper Artsy (Darcy in particular)... I like the children-story-book feel of it, and I am pretty much happy with how it has turned out!!  I think it will be a gift (one of them) to our eldest son and daughter-in-law on their wedding day in a months' time. Our son is a Maritime Officer, so this theme fits him so well. He can manoeuvre a ship into a harbor, can you believe it? .... and has been doing so in Rotterdam, Mexico and Alaska.    

Have a go at this theme as there is still (a little) time left to enter our current theme challenge! Rumour has it that PaperArtsy have brand new aprons coming soon, so you will actually get the newest version,  available very soon if you win the challenge!

Ellie Knol from PAPER-STAMPS-COLOR !!
                  http://ellieatcs.blogspot.nl/

I also teach workshops: Kom spelen met papier, kleur en stempels!  When I have a new workshop I add a new post, and it can be scheduled on any date! 


We always hope that you  learn something interesting from our blog

Our creative team love to read your comments so much, so please take time to let them know you've been inspired!  

You must complete step 1 AND 2 to be entered into the draw. 

To join our challenge:
1. Leave a comment on the Topic Introduction Post and go in the draw to win a PaperArtsy Apron. 
2. Make something arty relevant to the topic, and link your creation from any social URL (eg. Instagram, Pinterest, Blog Post etc) sharing your original make to this challenge page.

The current topic link Topic 5: Nautical Colours will close 17:00 (London Time) Sunday, March 31st 2018, and the winner will be announced 2 hours later at 19:00.


All links go in the draw to win a PaperArtsy creative apron. Please make sure we can contact you as a prize winner - it helps if you share your contact info from the platform you opt to use.

Good Luck! If you have any questions, don't hesitate to ask!

Wednesday, 28 March 2018

2018 #5 Nautical Colours: Beach Hut Blues with HP {by Jennie Atkinson}

Topic 5:  Nautical Colours


I love watching how you pull a project together! What a great idea to use the gel plate to print your paint onto the smooothy for a slightly different texture. I reckon that Archival TEAL ink would have suited you (but they discountinued it a cazillion years ago - maybe we should petition them to bring it back as it was my FAVOURITE archival ink colour!). I still have an ink pad and a reinker so I am sorted at least! ~Leandra

Hi everyone, it's Jennie (Live The Dream) with you today sharing two little nautical blues projects.

My mind jumped to "beach huts" for our current challenge theme but I didn't want to make them 'seaside beach hutty" if you know what I mean! I picked a sightly nautical Hot Picks Stamp Set and and Seth Apter's new Midnight Fresco Chalk Paint and set about trying to create a denim and white theme. And this is how they turned out:


I have used a Hot Picks stamp set for this project which has a sort of nautical theme but a very useful text stamp as well.


To get a denim look from the Midnight Fresco Chalk Paint I decided to use my Gelli Plate brayering just the one colour on to the plate. 


By pressing the Heavyweight Smoothy Card into the paint it peeled off quite unevenly and I got a more mottled effect than straight painting would have achieved.


The large background stamp fitted my die cut well and I got a lovely chalky finish by using  Cloud White Tsukenko Versamagic Chalk Ink.


While I had the Gelli Plate out I also coloured a couple of pieces of Regular Smoothy Cardstock with the same paint (basically mopping up what was left on the plate). Once the flower was die cut I was able to use a sanding block  to lift off the colour from the edges of the flower to get a  lovely white edge. I really find that this is very effective for handmade flowers and use this technique a lot. 


It was then a case of looking for individual white and blue items to decorate my huts.


It was difficult to find the right blue ink to tone in with the Chalk Paint and the best match I could get was Cobalt Ranger Archival Ink. I did try blacks and greys but it needed to be a blue ink so as not to detract from the rest of the project.


The metal was toned down using Midnight and Snowflake Fresco Finish Chalk Paint.


I love the that the stamp was large enough to wrap around the side wall.


The small tag was made by cutting out some of the individual words from the text stamp included in the set. I had cut out quite a few but didn't manage to use them all.


Again, I love the way the text wraps around the sides .......


..... and onto the backs!

I had intended to use the sentiment BEGIN but unfortunately it was too big, so I used a selection of phrases from Alison Bomber's Dreaming and Doing (EAB07).


Again I love how you can mix and match so many of Alison's phrases to pull together a project.


So, beach hut blues made it without looking like a seaside beach hut! And I really love how the Gelli Plate gave me the gorgeous denim effect as my base. Whilst there are lots of lovely techniques for using the Gelli Plate, something simple can work just as well! I always love "simple" !!

As always thank you for joining me for this nautical colours project.

Jennie x

Blog: Live The Dream
Facebook: Jennie Atkinson
Instagram: atkinsonjennie
Pinterest: jennieatk


We always hope that you  learn something interesting from our blog

Our creative team love to read your comments so much, so please take time to let them know you've been inspired!  

You must complete step 1 AND 2 to be entered into the draw. 

To join our challenge:
1. Leave a comment on the Topic Introduction Post and go in the draw to win a PaperArtsy Apron. 
2. Make something arty relevant to the topic, and link your creation from any social URL (eg. Instagram, Pinterest, Blog Post etc) sharing your original make to this challenge page.

The current topic link Topic 5: Nautical Colours will close 17:00 (London Time) Sunday, March 31st 2018, and the winner will be announced 2 hours later at 19:00.


All links go in the draw to win a PaperArtsy creative apron. Please make sure we can contact you as a prize winner - it helps if you share your contact info from the platform you opt to use.

Good Luck! If you have any questions, don't hesitate to ask!

Monday, 26 March 2018

2018 #5 Nautical Colours: 'Pretty Awesome' with ECL {by Corrie Herriman}

 Topic 5:  Nautical Colours


This canvas is fabulous. It can be really tricky to get bold, and simple-looking projects to work well, and Corrie explains it wasn't all smooth sailing for this Nautically themed adventure! But she weathered the storms and overcame all to master copic markers and slick, sharp stripes! .... OK enough imagery - take a look! ~ Leandra

Hi everyone, it's Corrie (MadeByChookwith you today, and I am exited to be here! For today's project I have made a 8" x 8" canvas in nautical colours. Now to me nautical colours are white, dark blue, red and a touch of gold. So that is what I used for this project. I also used one of the fabulous stamp sets by Clare Lloyd. 


I love the combination of painting, stamping, collage and colouring images with Copic Markers and that is exactly what I have done here. 


This canvas almost ended in the bin as I messed up the edges and had to redo them. They are still not perfect but I think I managed to rescue the project. After I painted the stripes I inked the edges with Archival ink {Cobalt} and then added the stamping but I didn't like it and tried to remove the ink, resulting in a big mess... lol. So I repainted part of the canvas and repeated the process but didn't add as much. I think it looks good now. 


This is how it started out. I got a small canvas and then painted the stripes with a mixture of Fresco Finish Chalk Acrylics {Baltic Blue} and {Glass Blue} to get the right shade of blue.  I used {Snowflake} for the white. Now, I used an old roll of washi tape to mask the white before painting the blue. I did this because I ran out of masking tape. The great thing was that this washi tape actually worked better than the masking tape. I had a lot less bleeding ! 


I added a little tiny bit of gold embossing because, for me that is all part of the nautical look. I used one of the stamps from the set and heat embossed with gold powder. 


So, after painting the stripes I stamped the girl from set {ECL09} on a piece of white card stock and coloured her with Copic Markers. 


I did prefer her without her bun so I simply cut it off. When I finished colouring her I adhered her to the canvas. 


The plan was to stamp the flowers on separate card stock too and then paint them with red Fresco Finish Acrylic Paints but unfortunately that didn't work very well so I decided to re-stamp them and to colour them with the Copic Markers as well. That worked really well and after colouring I cut them out. 


In the end, after I overcame my mistakes, this was a really easy canvas to make. Painting the stripes was a doddle using the washi tape to mask. I was determined to just use the one stamp set but in the end I had to add some background stamping, which adds more interest I think. I used one of my favourite stamps for this which is the text stamp from the {EEA04} set.

I hope you will have a go at making something with these colours too because they are great together. 

Thank you so much for stopping by here today ! I hope you will visit me in these locations too : 


We always hope that you  learn something interesting from our blog

Our creative team love to read your comments so much, so please take time to let them know you've been inspired!  

You must complete step 1 AND 2 to be entered into the draw. 

To join our challenge:
1. Leave a comment on the Topic Introduction Post and go in the draw to win a PaperArtsy Apron. 
2. Make something arty relevant to the topic, and link your creation from any social URL (eg. Instagram, Pinterest, Blog Post etc) sharing your original make to this challenge page.

The current topic link Topic 5: Nautical Colours will close 17:00 (London Time) Sunday, March 31st 2018, and the winner will be announced 2 hours later at 19:00.


All links go in the draw to win a PaperArtsy creative apron. Please make sure we can contact you as a prize winner - it helps if you share your contact info from the platform you opt to use.

Good Luck! If you have any questions, don't hesitate to ask!

Sunday, 25 March 2018

2018 #5 Nautical Colours: Layered Composition with ESA {by Autumn Clark}

Topic 5:  Nautical Colours


I have noticed so many people online following Birgit Koopsen's 31 days of gel-printing. If you need to learn more, go and check it out! She has a wealth of experience and ideas to share and gel prints are a joy once you get the hang of it! In this post Autumn gives her take on how you might incorporate stamped, gel-printed layers into a notebook cover.  ~ Leandra

Hi everyone, it's Autumn Clark with you today to share my grungy, Seth Apter inspired altered composition notebook.  

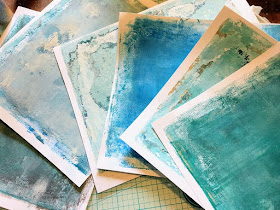
I was in the mood to experiment with the beautiful range of Fresco Finish Chalk Acrylics I've collected and make a paper collection inspired by coastal colors.  For me, it is a treasure hunt to sort through my gel-printed pages for just the right portion to stamp onto or die cut.  


I truly had no particular project in mind, and just wanted to experiment with  stamping PaperArtsy  Eclectica³ {Seth Apter} Collection (ESA08) for the first time.  

I decided to try spray a bit of water to my plate with each small squirt of Fresco Finish Chalk Acrylics.  I alternated between Inky Pool, Glass Blue, Chalk, Slate, China, Jade, Blue Oyster and Smurf.  I used a tiny brayer and blended my paint with the water carefully to avoid streaks.  I was so happy that some of my former layers lifted into the prints, especially the metallics from THIS post.


I chose my lightest page for stamping my focal elements and the darker pages for die cutting and more stamping.  I was considering using old book covers as my substrate, when out fell this old invitation.  I thought it ironic to be so very specific with the time and longed to set aside that very hour and a half of each day to dabble in this finished journal!  


I focused on creating depth in color and variation of pattern.  For my base layer, I chose PaperArtsy: Ink & The Dog (Mini Stamp 23).  I love how this stamp compliments the detailed designs in Seth's set.  


In the end my collage was so large and the old beloved composition book yielded the perfect substrate.  With so much texture and pattern, this book begs to be opened, but happily lies pretty flat to work inside.  


So how are you printing and what colors would be in your nautical palette?  I love letting my plate do the work of painting my pages, and my stamps doing the work of building my patterns and truly enjoyed doing so in this color palette.  I hope you're inspired to have a go yourself!  Cheers, Autumn

Website: SewPaperPaint
YouTube: Autumn Clark - SewPaperPaint
Pinterest: Autumn S Clark
Facebook: Autumn Clark
Instagram: @sewpaperpaint

We always hope that you  learn something interesting from our blog

Our creative team love to read your comments so much, so please take time to let them know you've been inspired!  

You must complete step 1 AND 2 to be entered into the draw. 

To join our challenge:
1. Leave a comment on the Topic Introduction Post and go in the draw to win a PaperArtsy Apron. 
2. Make something arty relevant to the topic, and link your creation from any social URL (eg. Instagram, Pinterest, Blog Post etc) sharing your original make to this challenge page.

The current topic link Topic 5: Nautical Colours will close 17:00 (London Time) Sunday, March 31st 2018, and the winner will be announced 2 hours later at 19:00.


All links go in the draw to win a PaperArtsy creative apron. Please make sure we can contact you as a prize winner - it helps if you share your contact info from the platform you opt to use.

Good Luck! If you have any questions, don't hesitate to ask!