"Hi everyone, Clare here with my first project for PaperArtsy. This week I am using some Squiggly Ink stamps in a variety of ways, I hope you find these projects might trigger your muse to adapt the ideas into something you could do too.
There
are a lot of little elements that all go together to make my finished project
so lets start with the wooden spool base.
To begin with I painted
the wooden spool with some Snowflake which would act as a base coat. Once dry I painted both ends
with Little Black Dress.
Next,
the decorative panel that will wrap around the spool. I measured and cut some
card to size with a bit extra to overlap.
and then stamped with Squiggly Ink: Tops and Tails (Plate 3)
Next I painted the panel with a watery layer of Inky Pool. It's a translucent, but by watering it down further you can control how much pigment goes onto the cardstock.
The flower detail is painted with Tango,
Inky Pool and Tinned Peas.
Tips: If you want the orange to contrast more, then put a little bit of snowflake under the orange flowers first, or don't wash the inky pool over the actual flower heads. And if you find painting small areas like this tricky, then dip the hard end of your paint brush handle into the paint and dab spots of paint onto the flowers.
I decided to add little extra stamp detail to
the top and bottom of the panel using a flourish from the Squiggly Ink Collection: Tops and Tails (Plate 2).
Once
everything is dry wrap it around and glue it down.
Now,
I wanted to create a little altered 'character' to add to the top of the spool. I
chose 2 images from the Squiggly Ink Collection: Tops and Tails (Plate1)
and thought it might be fun to use the centre bird house from Squiggly Ink:Flora and Fauna (Plate 3), as the character's body.
They were
stamped using Black Archival Ink,and then base coats painted using blush...
and my already selected colour scheme of Tango, Inky Pool and Tinned Peas
Next I added a little extra depth
and shading using some complementary pencils.
I
then cut them all out and used some twisted black wire to build my little
altered character.
You can adjust the spring/ neck quite easily, this can be a neat way to give her some personality by cocking the head to the side too.
I
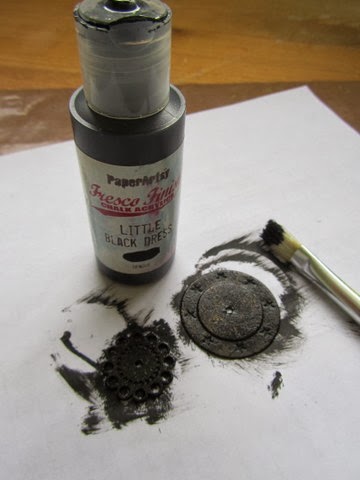
decided to add some additional layers to my base spool using Prima Finnabair VintageTrinkets. These were painted black with Fresco Acrylic Paint.
I buffed on some Indigo Treasure Gold
Okay
so now it is time to put it all together so you can see the inner workings of
my mind!
The
Prima Finnabair Vintage Trinkets were glued on the top and bottom of the spool;
then my character on the wire was threaded through and the wire folded to one
side under the base.
To fasten everything securely, I squeezed a large blob of
hot glue onto my craft mat,
pressed my altered spool firmly into the hot glue
and peeled it off the mat when cooled. This gives the spool the stabilty it needs, as the wire would leave a bit of a lump.
As luck would have it, this embellishment has a slight recess for the wire to sit in too
The finished altered spool.
Leandra Says: Hi Clare, great to have you here! Awesome job with those Squigglies! I love how easily the pencils add depth to the painted base, and the Prima Bellies make a great addition to the detail of the spool base. Fabulous and welcome!
Gillian Says: Welcome Clare, lovely to have you kick start the GD adventures for 2014 with such a fun/quirky project. The Squiggly Ink images are perfect for such a project. Love it.
If you would like to join in this week's challenge and play along with Clare's techniques, then do link up your creativity here, and go in the draw to win some PA stamps of your choice! You need to link your entry by 17:00, Sunday January 12th 2014.
If you would like to join in this week's challenge and play along with Clare's techniques, then do link up your creativity here, and go in the draw to win some PA stamps of your choice! You need to link your entry by 17:00, Sunday January 12th 2014.


Welcome Clare. This project is so me. I love the vibrant colour, the fun, the quirkiness. Thanks for the inspiration. Bounding off to craftroom. Xx
ReplyDeleteLove this altered spool, Clare! What a fab start to your semester with Paperartsy.
ReplyDeleteThis is such a lovely whimsical project!What a great way to use a spool! I love how you really brought the Squiggly Ink stamps to magical life! Fabulous, Clare! Great vibrant use of colour too. Julie Ann xx
ReplyDeleteThis is so cute! I love Clare's style, so fresh and colourful!
ReplyDeleteA great start of the year!
Oh what a fabulous idea, love it and the colours are my fav too. Michelle x
ReplyDeleteThat is lovely & very cute. Fab first project Clare.
ReplyDeleteGreat start Clare, I am inspired already. Looking foward to the rest of your posts.
ReplyDeleteJo
x
Great start Clare, I am inspired already. Looking foward to the rest of your posts.
ReplyDeleteJo
x
Hi Clare!!! Great project, love all the colours & stamped images. Something i could achieve, thank you:-) xxx
ReplyDeletesuperb first project thanks Clare, the mind is whirring, love how you've used the stamps x
ReplyDeleteFantastic first make from Clare - so fabulous to have you here!
ReplyDeleteAlison x
fantastic CLARE!
ReplyDeleteThis is such a nice creation!
Love all about it!
xxx
Susi
LOVE THIS!!! and so very 'you' Clare!! x
ReplyDeleteAn amazing creation Clare ! Wonderful ! :-D
ReplyDeleteLove your spool art Clare! x
ReplyDeleteHi Clare, lovely to see you on the PA blog - I love your quirky style and am looking forward to seeing what else you've come up with for the week ahead! Claire x
ReplyDeleteWhat a cute, whimsical project!
ReplyDeleteI love it!
Thanks for the the instructions and step-out photos!
Fab project! Look forward to seeing more! :) xxx
ReplyDeleteThis is really funky, great start to this years blog can't wait for more x
ReplyDeleteTotally delightful - different and interesting!
ReplyDeleteOoh very different love your Project Clare xxx
ReplyDeleteWhat an original and delightful little art doll, Clare! Thank you for giving us such a lovely idea for using all those wooden spools we bought when France was here, lol! Now where did I put them ....
ReplyDeleteLucy x
Fabulous project- love squiggle inks -love using spools and the colours you have used are fantastic!
ReplyDeleteawesome, love this!
ReplyDeleteLove decorating spools, very cool.
ReplyDeleteWow wow wow truly gorgeous, fun, unique and very inspirational. I just used this stamp set for the video challenge in yellows, oranges and blues lol, I think the stamp suits those colours. I have the perfect stamp to have a go of this, I always have a stamped version of him on my desk, but I have never ever used him on a creation, and this is the perfect time for his debut :-). Hugs Kezzy xxxxx
ReplyDeleteYour first project is stunning!
ReplyDeleteFun!!! You can't help but smile!!!
ReplyDeleteLove this !
ReplyDeleteWow... you had giggles right when I saw your project. Heee Heee. Really- Fun. You have my old cogs going. Thank you. Sarinda
ReplyDeleteThis is an adorable tutorial! I just love this character! Such fun...thanks for sharing!
ReplyDeleteHugs Giggles
Lovely project,Altered Wooden Spool is so cute, I love it.
ReplyDeleteThis is a fabulous project!!! Coco x
ReplyDelete