Pages

Monday, 29 July 2013

True North Hand By Guest Designer Linda Cain ....

"Hi there, Your Friend In Art Linda back for a fun blending and stamping project".


I started with a base coat of Snowflake on everything. The substrate for this project comes flat and has 3 hearts to choose from as well. So I decorated them all at once with a few new favorite Fresco Paints. The Blood Orange is way too awesome for words.


I painted the Hearts first using Blood Orange, Claret, and Tinned Peas for the large one. The middle one has Guacamole, Limelight, and a dash of Beach Hut. And the smallest one is Squid Ink and Blood Orange

The circular base is painted with Smoked Paprika, London Bus and some Blood Orange.


I stamped with Archival Ink using LPC001 on the base, and then used some Snowflake to paint in a few accents.


The Limelight heart has the skirt section of the horse stamp from LPC019 on it. 


The small and large hearts have LPC001 stamps on them. As the circle is a base, and can be viewed from both sides, I stamped the image so it could be viewed the same way from both 'sides'.

Next I started with one side of the hand and added Lilac. Then I started shading the edges with Bora Bora and some Squid Ink. I tried to keep it only as shadows with the Squid Ink to make the hand have depth. 


The other side of the hand starts the same way with a bit of Bora Bora thrown in. But then I decided it was a bit dark, so to lighten it up, I added some GrungePaste with a spotty circle stencil. 

When it dried, I used Cut N Dry foam to sponge on Smoked Paprika and Zesty Zing which really adds some warmth. The last layer is stamping over it all with Archival Black Ink and Ink and the Dog Mini 60 – the Cogs and Gears image. 

I used the Rosettes stamp from LPC023 for the middle of the Hand, and added 3 colors of rhinestones to the centers.


The “True North” is from the LPC001collection again. The fun part was finding brads to easily make into rings for the fingers on the True North side. I just wrapped them around and bent the edges to keep in place. 


I left the fingers alone on the other side and just placed the hand into the base. 

I couldn’t see how it might work adding the remaining Hearts to the Hand. I just couldn’t cover up the paint. So I’ll save them for another day!!!


Hope you enjoyed this. I always love being on the delightful PaperArtsy Blog using their amazing products! TTFN!


Your Friend In Art
Linda

Leandra Says: How fun, this makes a perfect necklace holder! I can see now its together how the warm grunge spots on the hand reflect the colour of the base, and the rings are a great addition! Lovely to have you back Linda, thanks again for sharing your ideas with us!

Gillian Says: Loving the range of colours, especially the addition of the Smoked Paprika & Zesty Zing circles and the gears. Fun statement piece, perfect solution to hold necklaces/rings etc. Lovely to have you back Linda.

Sunday, 28 July 2013

Winners ....


So we have a lot to tell you about this week. First up lets get the weekly awards ceremony out of the way shall we?

To begin with, the week's winners from Darcy's weekly challenge are ....

Random winner #1 from the first draw (every single entry linked): Sarah B


Random winner #2  from the second draw, (only one entry per name) is: Helen


email Leandra sales@paperartsy.co.uk with your choice of A5 stamp, and your postal address and your prizes will wing their way to you.

The next issue to deal with tonight is NAME THAT GIRAFFE ! ...


As you know, Darcy made a stunning Giraffe last week! And we ran a competition to name him, and the prize is a box of PaperArtsy stash worth around £150, WOW. 

There were over 100 comments left on the blog for Darcy to filter through and select a name she felt suits her baby best. Here's the announcement straight from the Giraffe-Mum's mouth

Wow so many suggestions. With so many to choose from I made a short list.

Fresco, Nigel, Verdi, Dante, Arthur, Hector, Zarafa, Darwin, Kolle, Tresor, Gerard, Colin, Pistachio, Lawrence, Rodney, Chester, Gesso...

We had everything from royal baby names to plays on the PaperArtsy name. 

All of them made me smile, some had me scratching my head wondering how to pronounce them. But one stood out because it made me laugh out loud, literally.

I am always amused when I hear people call their pets 'blokey' names, such as Dave, Steve, Simon etc and so for that reason I chose

COLIN
 
It was Lyn Tivenan who said...

“Colin...just as soon as I saw him I knew his name was Colin”


Thank you so very much to everyone for your enthusiasm and suggestions, and to PaperArtsy for hosting this competition. 

Colin loved looking at the list of names and is a little overwhelmed by the attention but sends his love to you all.

Bye for now Darcy and Colin. x 
Lyn, please email Leandra sales@paperartsy.co.uk with your postal address so she can get your box off to you, remember someone will need to be in to receive it from the courier!

So to the week ahead.....

Well its a bit on an in-limbo week as we are out of cycle slightly

Sue Carrington will return next Sunday (August 4th) for her final week of Semester 2, duly followed by the rest of this semester's designers and their August projects.

However, we will not leave you hanging this week. We have lined up especially for you a couple of lovely projects coming up from Linda Cain on Monday, and Helen Chilton on Wednesday to round off the end of July. Then we have big plans for August, which will be revealed later this week....so check back!

Remember, we also have a week long space at the end of August for the much anticipated next round of #3UP from the #PAtwit(ter followers) who will all be receiving their mystery packets this week if they haven't arrived already. So sorry if you missed out on signing up for this round, the spaces unexpectedly filled in 48 hours, and we have 48 people playing in the next round. Something to look forward to at the end of August to see what they make from their mystery items received!

Have a great week, and keep on crafting!

Leandra and Gillian


Thursday, 25 July 2013

Darcy Wilkinson Project #4 The Giraffe ....

"I know for a few of you, this is the one you have been waiting to see. It has taken 3 months to build, but he is finally here.....yes it is a BOY"!

First job was to go and buy sheets of galvanised mesh, I got mine from the local DIY store. The young man serving me asked if I was building an aviary, and looked somewhat puzzled when I replied 'no, I'm building a giraffe' So armed with my mesh panels, a spool of strong wire and some pliers, I set about the building process. Other products used along the way were scrap paper/newspaper and masking tape. The whole body was stuffed with scrunched up paper, and then more paper was used as padding on the outside of the wire. The whole giraffe was them wrapped in masking tape to hold the padding in place and to provide a smooth surface for the clay. I have no kiln, and I am pretty sure I cannot get a 4ft giraffe in my oven...not that I tried, don't worry, no giraffes were harmed in the making of this project. So I needed to use air drying clay. Having checked out the prices of available air dry clay, and seeing how small the packets were, it became apparent that I would need to make my own.

I discovered the website of Jonni Good, ( http://ultimatepapermache.com/new-air-dry-clay-recipe ) and was delighted to see clay recipes on there. If you are at all interested in making models then I can highly recommend her recipe. Here you can see a slideshow of the building process.


So here he is ready to decorate.


I took some buff coloured tissue paper, I believe it came as packing with something. To give him a base colour I covered him in the plain tissue first. Then I mixed some Fresco Paints with water, and sprayed the tissue paper. I used Cinnamon, French Roast along with some Adirondack Butterscotch. I ripped these coloured tissue sheets into small pieces and gave him a second layer.


Now for the spots .. I tore up all the scrap white paper that I could find in the house, then soaked it in a bowl of water for about 30 mins. Next I used a hand blender to turn the paper into pulp. (Don't use the same blender for food, I have a separate blender for the kitchen and one for my craft room).


Next fill a large tray, (I bought a large cat litter tray just for making paper). Half fill it with water and add the pulp. You will need a frame and deckle, these are easy to make, search YouTube for videos. You sieve the pulp into your frame and squeeze out excess water. Anyone who has made handmade paper will be familiar with this part. Once you have your sheet of wet handmade paper, carefully tear off sections and drape over your chosen stamps. For the spots I used HPXT 02.


Press the wet paper down onto the stamp and leave for a few minutes. Then remove the stamp and allow to dry. This will generally take overnight.


This is how the paper moulds look once they are dry. You can see how detailed the impression is.


I trimmed close to the edges and then sprayed with dylusions turquoise ink. Next I sponged on Beach Hut, then Bora Bora and finally I dry brushed with Mermaid


Next I worked in a little Sapphire Treasure Gold, and then finally some Onyxite

 
The details really shows now, and they look like Verdigris.


 I made a whole bunch of them, approx around 100!!


Once they were all glued onto the giraffe I added smaller spots using Grunge Paste mixed with Beach Hut and Bora Bora.


I dabbed this onto the lower legs and face, then stamped into it with a stamp from HPXT02, again I finished it with Treasure Gold.

 
See how all the decoration built up here.

I don't expect you all to go off and build giraffes, how funny would that be, but I hope you will try the paper casting. Here I made moulds of some JOFY stamps, in exactly the same way.


Here they are on a hanging tag.


That's it from me this month, I hope you have had fun looking at these projects and that you are fired up and inspired to try out some of the techniques.

I shall leave you with some snapshots of our trip to the farm.


Leandra Says: Love the farm pictures, looks like he's got a friend already! Well Darcy, that was simply mind boggling, as I am sure the PA wider family will agree.

So we need a name for this chap! Please leave a comment on this blog post with your name suggestion. Entries close noon Sunday 28th, the winner will be announced along with the weekly winners Sunday evening, 28th at 7pm. Your prize??? A MASSIVE MYSTERY BOX of PaperArtsy stash easily worth over £150. Only one name entry per person please, Darcy is the selector, as she knows her baby best and what will suit him, her decision is final!

Gillian Says: Wow DArcy, this is INCREDIBLE. So inspiring to see how you have creating him from nothing! Thank you once again for yet another superb week!

Wednesday, 24 July 2013

Darcy Wilkinson Project #3 Garden Party Part 2 ....

"Did the projects yesterday get you in the mood for a party? It is all looking pretty, but there is something important missing... cake! Let's make something colourful for the cakes".

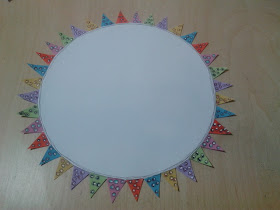
I took an A3 sheet of paper, put my glass cake stand onto it and drew around. I then added on another inch and drew another circle. Now between the two circles I marked out triangles, all the way around. These are painted with Fresco Paints, then decorated with dots of a contrasting colour. Cut out just the triangles, up to the inner circle.


Once all the paint was dry I doodled with black and white this makes this cake stand trim match in with the bunting from yesterday. If you want to make this more durable I suggest covering it with clear sticky back plastic.


So now we have a pretty cake stand, lets make the cupcakes more interesting too.
I took some plain white paper doilies, and using a compass I removed the middle.


I then cut the remaining outer part of the doilies in half...

 
... and then trimmed off about an inch from one end. These are now the perfect size to wrap around my cake cases.


Next I got out my Gelli Plate and some stencils and using only "Translucent" Fresco Paints I built up a few layers. You do need to be careful and not let the doilies get over wet as they can tear. Once dry I glued them to plain cartridge paper. This hides the painty backs, keeps paint from being near the food, and also makes the colours of the paint pop more.


I then cut them out, curled them around and glued the ends with about an inch overlap. I can't wait to pop some cakes into these. 


Of course the guests will want to take a cake home, so we need some pretty cake boxes. I measured my cake cases and first off made the insert that will hold the cake.


You can see it is just a square with a hole in the centre, the edges are folded and snipped at the corners. Glue the corners under the sides, then you can measure again and work out what size your box needs to be.

The stand should fit in snugly, but leave enough space above for the frosting on the cake.
I cut a hole in the front 'door' and added a piece of acetate.


Here you can see it all put together.


Now you have a blank box and you can go to town with decorating. I had some shimmery inked card left over from the invitation. I stamped lots of JOFY flowers on that card, cut them out and covered the cake box. 


I added a doodled line around the edges, and stamped a message for the top.


Finally I wanted to make a centre piece for the table. I thought about a vase of flowers, this led me to think about a metal pot of flowers. I wasn't sure how the Fresco's would work on metal, so I went in search of one. Of course all the ones I had seen in the shops had disappeared when I needed one, so I ended up with a watering can! It had a decal image on one side, this was easily removed with a little rubbing alcohol.


I then sanded the whole thing, the red paint was quite glossy, so sanding it gave me a bit of a key to add new paint. I wanted my top colours to be bright so I first applied a coat of Gesso.


I then selected my colours.. This is the order in which I used them. I started at the base of the can with dark green, moved up through the greens to the yellow. I dabbed each colour on with a sponge, this made them very easy to blend so there are no harsh lines. From the yellow I moved into the sky colours, ending with the darkest blue up near the top rim of the can. 


Once the paint was dry I then sponged on a little Snowflake to create fluffy clouds. At this point I was so pleased with the result, the Fresco Paints are so delicious and blend so beautifully. 


I then stamped some JOFY flowers onto scrap paper, and using BluTac I put them on the can ,playing around till I liked the arrangement.


I then wasn't really sure how to get my flowers onto the can. I did think the best way would be to stamp onto tissue paper and glue those on. Given the curve of the can I thought that would be easiest. I stamped a load of flowers onto tissue, painted the backs, and then painted the fronts .….and within seconds of adding them to the can I hated them ...
so plan B. Would it be possible to stamp directly onto the can? How fiddly would it be, given the shape? As it turned out, it really wasn't that difficult at all. The flowers on the main part of the sides were easiest, I used PaperArtsy Flexi Blocks, and Archival Ink. Just stamping as normal. The images on the spout and those closest to the handle were a little trickier. I had to use the stamps without a block, and gently roll them onto the can. But I took my time, and they all stamped ok. 


I then painted all the flowers using Fresco Paints.. and finally added a coat of spray varnish. I absolutely love this little can now.


However it's not very tall, for a centrepiece, so I decided to add some height.
First I used the reverse stamping method to make two sides of a butterfly. By stamping onto a plain rubber block and then using that to stamp onto card, means I can get a mirror image of the butterfly stamp from HP1204.


I coloured the butterflies with ProMarkers and then cut them out and glued them back to back. 


I trapped a bamboo skewer between both sides of the butterfly, and then added Glossy Accents to each side. I dabbed some Sky onto a paper towel and used this to swipe the paint onto the stick.


Next I took some white tissue paper, folded up in a concertina style, the tissue paper is trimmed at the ends and formed into a ball. There are many, many tutorials on making tissue flowers on YouTube. As I formed the tissue ball, I glued a bamboo skewer inside. I then stood the skewer into plastacine so that I could colour the tissue. I wanted the colour to be quite delicate, so I added a little Fresco Paint to a spray bottle with more than double of water. I then sprayed the flower.


Spray from a distance, and do not oversaturate the tissue. Then allow to dry naturally, if you use a heat gun you will blow the petals together and they will stick. If any are clinging together, peel them apart very gently whilst damp, once dry they will not come apart.


Once dry, add a slightly darker paint to the spray bottle. Do not add any more water, just a few drops of the next shade. Again allow the tissue to dry, and then finally add a third darker shade, and repeat the process. This flower has three layers of paint sprayed, the lighter one mainly on the top and the darkest one is mainly underneath.


I then went on to make two other tissue flowers, painting them in the same way.


I put a large piece of plastacine inside the watering can, and then popped in the flowers and the butterflies ....


...and so the centrepiece is complete, and we can finally set the table.


I will be back tomorrow night with a certain friend you may have seen me Tweet about recently .... all will be revealed soon. In the meantime, if you have been inspired to play along with any of this weeks challenges, click HERE to share your work.
Leandra Says: You've certainly earned that glass of wine! What a fantastic week of posts so far, love how they all link in to each other. Now you can have the best picnic-parties all summer long!

Gillian Says: Outstanding .... I really would like to be inside your head when you come up with all these creative and unique ideas. I'm chuckling away at you taking all the Garden Party pieces and setting them up ... looks amazing. Were you swamped with uninvited guests lol.