"Hi everyone Suzz here! I decided to continue my exploration of Fresco Paints and try a few other effects! I really enjoy working on ATC's or Tags because of their size. It allows you the opportunity to play around with techniques on a smaller space and then build up the design. I love participating in ATC swaps"!
ATC 1: Ice Angel
1. Cut a piece of white Smoothy cardstock 2 1/4" x 3 1/4" and paint the surface with a mix of Pewter and Baltic Blue Fresco Chalk Acrylic Paints.
2. Cut another piece of white Smoothy Card measuring 2 1/2" x 3 1/2" and paint with Fresco Pewter Paint.
3. Once the cards are dry, you can go ahead and paint a layer of Fresco Crackle Glaze over the surfaces. Dry before applying a healthy layer of Pewter quickly on top of the Blue base, and Baltic Blue on top of the Silver. One coat ... then the magic happens before your very eyes! As the pewter dries, the cracks will begin to appear.
4. Stamp the "Angel", "Wings" and "Peace" sign using blue ink onto white Smoothy card, then trim to size.
5. Stamp "Snowflakes" over ATC blue background using Versamark Ink then heat emboss using silver embossing powder.
7. Highlight wings and edges of peace sign using glue pen and sprinkle with silver glitter.
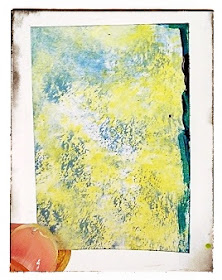
"My next ATC started from the excess paint on my craft mat, not wanting to waste the paint I decided to use it for my next background".
1. Wipe up (or apply) Haystack paint with a babywipe, dab onto white cardstock, repeat until you are happy with the background.
2. Next wipe up the excess Inky Pool Fresco Paint from your craft mat, again repeating the step above until you are happy with the effect.
2. Next wipe up the excess Inky Pool Fresco Paint from your craft mat, again repeating the step above until you are happy with the effect.
4. Next up is stamping the image ....
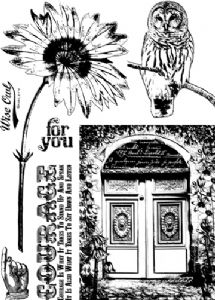
Stamp "Peace Sign" from Ink and the Dog: Winter Wonderland Plate 2 using black ink onto the painted background.
5. Punch out a "heart and key" then paint with the same colours as your background, stamp numbers over the heart image, attach to ATC. To make the images "pop" I added white gel pen around the edges.
"Okay are you still with me as I go onto ATC #3 .... this ended up being my favourite because of the beautiful owl image and the wintery background".
ATC 3: Owl
1. Paint Metal Card with Fresco Crackle Glaze Paint, then once dry, apply Inky Pool over the glaze. {"I wasn't happy with how the streaks of paint were appearing at this stage so I decided to smear Snowflake Fresco Paint over the surface. I loved how it turned out"}!
Leandra comments (with technical explanation, LOL): Aren't happy accidents great! I'm just going to take a minute here to add some product info here so people undestand what happened and why. It may be helpful to file for later reference.
Metal card has a special coating, almost a tooth, that is designed to receive ink (StazOn is ideal, and specifically formulated for smooth shiny surfaces like metal). So you will notice metal card is easier to stamp up than regular metal - we thought its nice to make these things easier for stampers!
The tooth on the metal also means that it is easy to paint directly onto metal as it easily clings to the tooth of the surface. However, by sealing the metal surface first with a glaze,even crackle, you kind of seal over that tooth. As Inky Pool is a translucent paint with LOW coverage and a dark shade, you will get a type of streak effect over a glazed surface.
I think in general, it's better to use opaque paints on top of crackle, as a translucent will allow the base coat to show through not just the cracks, but in the case of metal card it will shine through the painted areas too to a lesser extent.
Another option to try is to mix a touch of an opaque in with the inky pool, so you could put some (just a dash, 5%) of Baltic blue, or black, to maintain the dark nature of that paint if you added white you would get a pastel version of Inky Pool
...back to Suzz....
4. Stamp grass tips with the birds onto the background using archival jet black ink, again, emboss.
5. Stamp 'wise owl' quote. Distress the edges of the ATC and attach to white card edged with Archival Ink (Jet Black)!
Leandra comments (with technical explanation, LOL): Aren't happy accidents great! I'm just going to take a minute here to add some product info here so people undestand what happened and why. It may be helpful to file for later reference.
Metal card has a special coating, almost a tooth, that is designed to receive ink (StazOn is ideal, and specifically formulated for smooth shiny surfaces like metal). So you will notice metal card is easier to stamp up than regular metal - we thought its nice to make these things easier for stampers!
The tooth on the metal also means that it is easy to paint directly onto metal as it easily clings to the tooth of the surface. However, by sealing the metal surface first with a glaze,even crackle, you kind of seal over that tooth. As Inky Pool is a translucent paint with LOW coverage and a dark shade, you will get a type of streak effect over a glazed surface.
I think in general, it's better to use opaque paints on top of crackle, as a translucent will allow the base coat to show through not just the cracks, but in the case of metal card it will shine through the painted areas too to a lesser extent.
Another option to try is to mix a touch of an opaque in with the inky pool, so you could put some (just a dash, 5%) of Baltic blue, or black, to maintain the dark nature of that paint if you added white you would get a pastel version of Inky Pool
...back to Suzz....
2. Stamp "owl" from Vintage Ink and the Dog Collection: Plate 2, using Archival Ink
(Jet Black) onto white smoothy card. Heat emboss using black fine detail embossing
powder, or for a sharper stamp detail on some stamps, clear powder over black ink is a nice option.
3. Paint the owl background using a combination of blue ink and Snowflake Fresco Paint. Highlight with white gel pen, cut out. 5. Stamp 'wise owl' quote. Distress the edges of the ATC and attach to white card edged with Archival Ink (Jet Black)!
I hope you have enjoyed this mini ATC series, that's it for me this month but do pop back and see me again the last week in February!
Happy Stamping!
Suzz!
Leandra Says: Thanks Suzz, I haven't made an ATC for years. I used to be involved in loads of swaps. Our original Ink and the Dog Collection of stamps was designed for ATC's so those images are, on the whole, sized just for that format. Its amazing what you can do with such a small space.
Gillian Says: What better way to use up the leftover paints Suzz .... ATC's are such a quick and fun way to get paints, stamps and ink down onto card! Wise Owl is my fav too such a beautiful image.
If you would like to join this week's challenge and play along with us via inLinkz, please take a moment to share how you have been inspired by Suzz's creativity with PaperArtsy products. Use some/all of the following: PaperArtsy Stamps, Fresco Paints, Metal Card (or metal) and you will be in with a chance to win stamps of your choice {either 1 x A5 set or 2 x A6 sets or 3 minis} . Click HERE to be in with a chance of winning!


