Hi everyone
Jennie Atkinson (Live The Dream) here with you today.
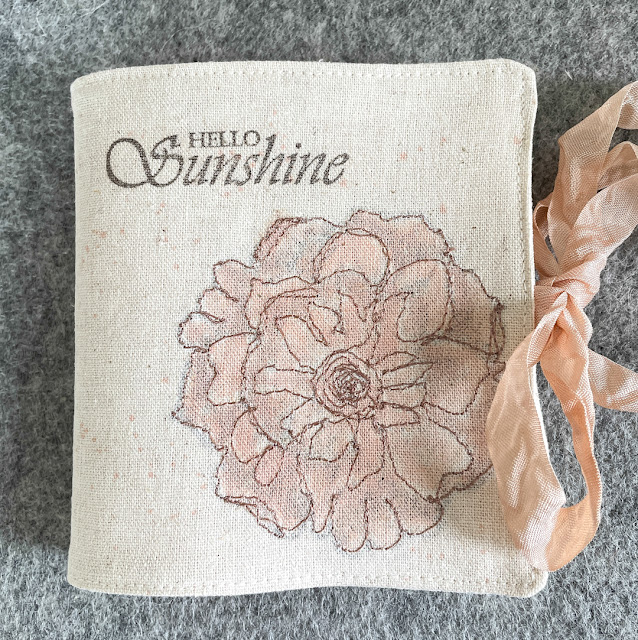
I often use stamps as a basis for freestyle embroidery on my sewing machine - I am not an expert but I just enjoy the freedom of stitching in that style. Tracy's flower stamps are fabulously blousy (as my Mum would have said) and are quite detailed. So when I suggested using Tracey's stamps for some free style embroidery for this theme I wasn't absolutely certain whether it would work. But ..... with a little bit of patient sewing and some lightly painted Infusions I have developed a soft vintage style for these wonderful stamps, which I absolutely love!
I love the softness of the painting and how the stamped image on the reverse of the material adds the shading. The resulting Needle case has a lovely vintage feel to it.
My choice of stitching and use of course calico and silk thread gives a light texture for this project which fits our quarterly theme.
I like to start all my projects with a small kit ..... a collection of items that I think I might use based around my initial ideas. As I intended to stamp and stitch on calico I got out some plain and coloured materials, although the one I eventually used was a heavy quality one. I intended to go vintage in terms of colour as again the theme is to explore alternative ways of using Tracy's stamps. Some tea dyed ribbon, cream lace, bamboo buttons and some different coloured threads were added to the pile.
I had thought the heavy calico would take PaperArtsy Fresco Paints but in the end I opted for Infusions as I could make them really light and opaque. So the Infusions were not part of my plans at this stage!
And my choice of stamp set was TS031 as I absolutely adore the flower but also the sentiments.
And I did have a little practice ! it is always good to get the machine instruction book out and ensure the tension is correct for freestyle sewing. I experimented with different threads which gave different effects. And you can see how one leaf got painted with the Fresco paint which was enough to put me off the idea !
Preparation is key with calico and I spent some time ironing it to get all the creases out. The flower was stamped with dark brown waterpoof ink - I had tried lighter ink but the calico was too thick for the image to be clear. This is the foot I use on my machine for free style embroidery - it is called a darning foot as my machine is 40 years old, but it does function the same as a modern foot for freestyle embroidery. I decided to use a silky copper colour thread.
This is what it looks like for sewing - as you can see it is not so easy to see where to stitch as the image is so detailed. Sometimes it is not easy to hold the stitching in the right place - free style stitching means the plate that holds the material in the machine is down so everything moves around quite a bit!
And this is the reverse side. You can see how the ink from the shaded areas shows through despite the thickness of calico.
And then to the painting. PaperArtsy Rusty Car Infusions CS17 always has a lovely pink/tea coloured finish to it and for a vintage look is one of my favourites.
I made a really watery puddle and was a bit worried when it soaked into the calico ..... and so in a panic I dived for the iron!
This really helped to get it dry quickly and didn't smudge the colours at all. Phew ! Close up you can see all the different colours within the Rusty Car Infusions. And the stitching contains the paint. I didn't swamp the image with colour but painted each individual sewn piece of the image separately.
I now knew that this was going to work and I loved the soft result. I had always had in mind to make a small calico book, but I had now completed the "unknown" stage and could plan my project.
I love the quotes that come with this set of stamps and used two to create a front and back of what was now going to become my book. As I stated above the calico was quite thick and needed a good quality dark waterproof ink for the stamping to be perfect.
I was then down to needlework skills which is not my strong point! The book is very basic with the front sides faced together and sewn around the sides leaving a small hole to pull everything through. (I think it is called "bagging") I captured some ribbon on either side for a closure. Remember the watery puddle of Infusions ...... what was left over dyed some ribbon perfectly so all the colours matched.
It was a bit of an effort to pull everything through the small hole I had left and it needed a good iron afterwards.
And the final part of this process was to stitch around the outsides - it gives the calico a bit of support and a nice finishing edge (although you can see I am not very good at corners!).
My practice piece of fabric was still sitting on my craft table and I quite liked the small flower even though some of the colours were a bit strong. It took a little bit to find enough to trim for a back and front, but I managed to create this small pin cushion to match the needle case.
I managed to find some felt in my stash that was a similar colour but I didn't have enough to make two complete pages for the inside. But the smaller piece works. I was also pleased to see that the corner rounder also rounds felt. It just makes it all look a little more professional.
The felt was sewn into the book with a single line of stitching down the middle and I added a little lace to the inside covers. As this was a bit of an afterthought I had to glue these down rather than stitch them. I have only stuck the lace down on three sides so you can tuck a packet of needles under the lace.
The single layer of stitching for the felt had created a nice spine and I felt it needed something as a decoration. I layered lace and other items but everything seemed a little overly, so in the end settled for three small vintage buttons which didn't detract from the overall softness of the covers.
Here is the back cover - I particularly like the fact that only part of the flower is showing here. There is something rather pleasing about a "stamped off" image and the sewing gives it a good edge.
I chose to do my sewing using the freestyle function on my sewing machine but you could easily outline some of the image with hand sewn stitches to create something similar. Or alternatively you could use the stamped image on the front and use embroidery stitches to create texture and interest, for example french knots in the middle of the flower would look quite stunning.
Tracy's design is very detailed and you might want to give this technique a go with some simple outline stamps. I have used many of Scrapcosy's flower designs in the past so there are plenty of PaperArtsy designs out there which can be used for the same technique.
And lets here it again for that little bottle of Infusions ...... I think they have to be my favourite item in the craft room! They give over and over in so many ways and seem to last a lifetime!
As always thank you for joining me and I hope my experiments with stitching and Infusions painting will give you some ideas for working on fabric.
Jennie x
Blog: Live The Dream
YouTube: @jennieatkinson
Facebook: Jennie Atkinson
Instagram: atkinsonjennie
Pinterest: jennieatk


1 comment:
Wow Jenny! They look amazing and I am super impressed with your sewing.
Post a Comment