Hi everyone, it’s Peley Renata with you today and in this blog, you can see me struggle, you can see me squirm as I do a project way out of my comfort zone. As perhaps some of you know, I am mostly comfortable with doing art journal pages, with little to no dimension. And now I challenged myself to make a very dimensional and somewhat abstract 3D project in combination with some fun stamps designed by Seth Apter.
Of course, it wasn’t pain and suffering. You know, a bit of a personal challenge builds character. And if I’m going to be completely honest, I did enjoy this project and now that I let go of my fear of this type of 3D bulky and layered projects, I’m probably going to make them again from time to time.
Anyway, as the quarterly topic is “Tracks”, I decided to make my project in a manner of a riddle, and you have to follow certain tracks and clues to find my secret message. This idea got me quite immersed and had lots of fun figuring out how it would work.
I guess a lot of you who are PaperArtsy fans are also familiar with the work of Seth Apter. He designed quite a selection of stamps and colors for them. And even more, he has a unique and recognizable style, and my task was to make a project in that particular style. Of course, that doesn’t mean to simply copy his work, but rather to be inspired by it and add some personal touches. And in truth, being inspired by his work wasn’t that hard.
To get a better picture of Seth Apter’s work, I went for a bit of research on his
web page. If you visit his page and click on the “Artwork”, you can get a clear image of his art approach. Now what’s left to do is to try to incorporate his style with my own, together with the PaperArtsy quarterly topic.
The second step after the research was to go and see what kind of papers and items I could gather up from my stash, and start formulating a strategy to approach my somewhat developing project idea.
Now, don’t get intimidated by my selection of items. You most certainly don’t need all these. Anyway, at the end I won’t use even half of them. These were just gathered up to get my imagination flowing.
Over the years I have become a passionate collector of little metal charms. And I always think: “Oh this one looks versatile/pretty” or “I’m sure I’m going to need this one sooner or later”, but the truth is, I almost never use them, so I made a promise to myself to use a few of them in this project.
Have you ever heard of the infinite calendar? It’s basically what its name says, a calendar which you move manually every day in order to keep track of the date and you can use it every year over and over again. If you are curious, you can just look it up on Pinterest and there you can find several versions of this calendar. I was inspired by the round version, to make my first “clue” piece. The starting point for this element was the stamp set from Seth Apter (
ESA31).
If you take a look at this stamp set, it has this gorgeous round design with several circles with letters. So, what I did is to take a heavy weight paper (300gsm) and applied a mix of PaperArtsy Fresco Finish Acrylic Paints: Buff (
FF96) and Squid Ink (
FF56). When the paint was dry, I stamped the previously mentioned stamp three times and heat embossed it with black embossing powder.
After cutting out three circles of my stamped images (each one smaller than the previous one), comes the tricky part. Now, I’ll let you on a little secret, I genuinely dislike designing precise and working 3D elements, so I asked my husband for a little help. What I needed is to craft an element which will hold my circles together and have an opening through which we can see one letter from each of the three circles. On the image below you can see what we came up with and what my husband drew for me. 😊
The next step was to cut out the drawn shape and connect the elements.
By the way, you know how foam tapes are sticky on the bottom, but on the top, they have that smooth paper, which you are supposed to peel off? Well, in order to prevent my circles from sticking to each other and to spin more smoothly, between each of them I put a piece of a foam tape, without removing the protective layer from it. Meaning, it sticks to the lower circle, but it leaves the upper part non-adhesive and smooth. That provided the buffer area for a smooth rotation of the circles.
With that, all the elements were ready, so I just pierced a hole in the middle of the circles and connected them all with a metal braid. Here you can see the finished result.
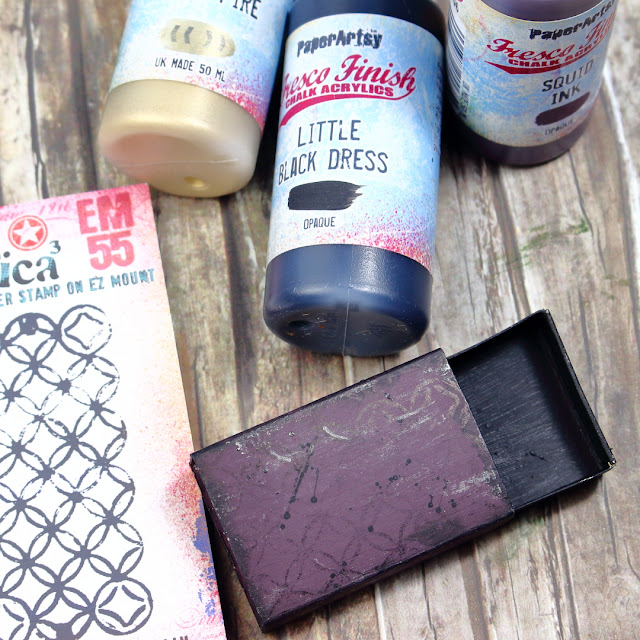
This rotating circle is supposed to be one of my focal elements. But now I wanted to make another important piece. A secret box with a message. My box was actually an empty matchbox, but of course first I had to paint it. For this I decided to use once again PaperArtsy Fresco Finish Acrylic Paint Squid Ink, but also Black Dress (
FF19).
At this point my box looked rather plain so I decided to embellish it a bit with one of the mini stamps designed by Seth Apter (
EM55). I just stamped the image with the archival ink, without caring about getting a perfect impression. Then once again I just had to add another small detail and this was a tiny bit of the PaperArtsy Fresco Finish Acrylic Paint White Fire (
FF121). And when I say “a tiny bit” I really mean a tiny bit as I just put a very small amount of paint on a toothpick and rubbed it over the surface of the box. It is a very subtle detail and it can be seen just under certain light, but I think it really looks nice and it gives it a more metallic look. Oh, and I also used White Fire on the black piece of my rotating circle.


In order to make the box open more easily I attached to it a tiny metal clip on one side. Now for the content of the box I had a tea-dyed notebook paper and I stamped another one of the Seth Apter mini stamps (
EM65) on it. This was to serve as my “secret” message. And just for the fun of it, I also put a small metal key next to it.
With these two elements crafted, it was time to start thinking of a composition and another round of checking for items that I could incorporate in my project.
I must admit, at this point I was very confused with how to proceed. I started to doubt the size of my originally planned substrate. I also felt that all those goodies that you saw me assemble at start aren’t appropriate, or just not enough. It was time for me to take a break and wait for a new day to start with a fresh brain. And guess what? The next day I sit at my crafting table and did some fumbling and tumbling…and again came up with nothing. It was time for some more research. I went scouring Pinterest, my fellow crafters Instagram accounts and of course Seth Apter’s web page and finally some ideas started to form.
I realized that I wasn’t troubled just by the size of my substrate, but also by the oval shape of it so it was time to consider some other options.
Years ago, my husband was into some furniture-making, so we still had some wood planks of various sizes stashed around. There I found some smaller boards that finally helped me to start going again.
I took a few narrow boards, but I wanted to alter their color a bit. As I decided to stick to my original color scheme, so again I took PaperArtsy Fresco Finish Acrylic Paints Squid Ink and Little Black Dress. But I didn’t want to just cover whole boards, instead I put the paint only on the edges of the panels, so it would look something almost like burnt wood.

Now the question was how to connect the wood planks. The idea was to use a furniture stapler gun as it would contribute to the whole grunge vibe, but apparently, I am one of those people who can’t find stuff in their own home, so I had to find another solution.
First, I thought just to glue the boards to each other, and it was not a bad solution, but I wanted something a bit more special. What I did was to yet again ask my hubby for some help. He drilled 16 small holes in my planks so that I could connect them using a bit sturdier thread. For each connecting point we made four holes so that I could connect the wood in an “X” shape, as you can see on the image below.
When connecting the planks, you can decide how you want to align them. I chose to make them just a little bit off, but I did pay attention to use one plank that was a bit shorter than the others, so that in that place I could put my matchbox with the message. I glued one side of the matchbox to the lower side of my shortest wood board.
At this point I decided to build up one more element before I start concentrating on my layout. On the stamp set PaperArtsy Seth Apter ESA31, you can see those two stamps with vertically spelled words and since they very much appealed to me, I decided to use one of them. When I was searching for my possible substrate, I also found these mini 5-10cm narrow wood panels which were just the ideal size for stamping my words. I prepped the panel with PaperArtsy Fresco Finish Acrylic Paints Buff (FF96) and Squid Ink (FF56). When the paint was dry, I stamped and heat embossed the word ‘document’ with black embossing powder. And here is how it turned out.
Now
with my substrate and a few important elements finally complete, it was time to
start thinking about the composition. And guess what? This turned out to be the
most challenging part of my project yet. I had two considerations. First, I
really liked the look of my wooden boards and wanted to be sure they are not
completely covered with the elements that I planned to layer on top. Second, I
didn’t want just to pile my elements randomly, I wanted to give it all some
meaning and sense.


6 comments:
Wow Renata, there is no way anoyone would think that you were out of your comfort zone! You totally rocked this!! I love how you took your time, and worked out all those emerging challenges along the way. THe wood is joined beautifully with those rustic stitches, and so perfectly painted to make it look aged! I love the rotating centre piece. Everything about this is just perfeect! Thankyou for sharing your process so wonderfully! Leandra
Thank you so much Leandra. :) Yea, I really liked how the wood binding turned out. It's seems I was lucky for not finding my furniture stapler :D
I must agree with everything already said above, and please enjoy your success. Your art and description is clear and serves as an encouragement to me and others. Congrats Renata!
This is absolutely epic. You have created something so special and I so appreciate that you stepped out of your comfort zone and usual style to make this monumental project come to life. Thanks a million for this!
Thank you so much Linda. Saying my art inspires and encourages you is the greatest compliment I could get. :)
Thank you very much Seth. I really appreciate that you liked my project as your own art style served as my inspiration.
Post a Comment