
2018 Topic 16: Reinkers

Ohhh this technique takes me back! I love it when our bloggers revisits a crafty idea from back in the day! Wanda has many cracking ways to manipulate shaving foam !! ~ Leandra
Hi everyone, it's Wanda Hentges with you today, and I'd like to share some cards with you that start with a shaving cream technique background.
I
had several different ways to use reinkers on my mind and finally
decided to focus in on using them with shaving cream but also touch on a
couple of other ways. Marbling with shaving cream is so much fun!!!!
If you've been stamping a long time, you have probably heard of the
technique. Today we are going to focus in on using reinkers with the
shaving cream but you can also use sprays and paints. This is one of
those technique where I like to cut a stack of paper and then just play
for an hour. You can learn so much with that play and at the end have a
big pile of backgrounds (or the beginnings of backgrounds) to use on
future projects.


For
this post I chose to use Distress Ink reinkers but you can use any kind
you want and I would recommend trying different kinds and also trying
different kinds of paper to see the differences and determine what you
like. I put some shaving cream on a styrafoam plate and spread it out
with a palette knife. I didn't realize until I started that the can of
shaving cream I had was almost empty. Even though I shook it well it
wasn't as light and foamy as usual but a little heavier and a bit airy.
It still worked fine. I dripped 2 light colors on the foam to begin
with.


Another way to use reinkers is for adding color to pastes. Here I've added just a drop to some Grunge Paste....

shaving foam... and then I put it through an image from the Kay Carley stencil, PS076.


I didn't use this piece yet but it's always great to have extra backgrounds around.


I did not move the shaving cream at all. No going over it with a palette knife and no swirling with a skewer. I took another print but this time I set the end of the paper down first near the edge of the plate and pressed the paper working from that end to the other end. I loved the soft blending I got!!!!

I repeated that same thing a few more times turning the plate a bit each time. Way cool!!!!!


Here are the same colors on a piece of white cardstock although a bit more of the reinkers squeezed out onto my sheet when I did this piece.


Using stencil, PS042, I added stamping and sponged ink to the piece masking either with paper or tape as needed.

Here I've mixed just a drop of Sunflower Archival Ink reinker with some Transparent Gloss Texture Paste and I'm going to put this through the stencil. I wanted just a hint of color to the paste so I chose a very light color. I used Archival reinker because I didn't want the ink to mix with the ink already on my panel.

Here it is after the paste is all dry. Cool, huh!!!!

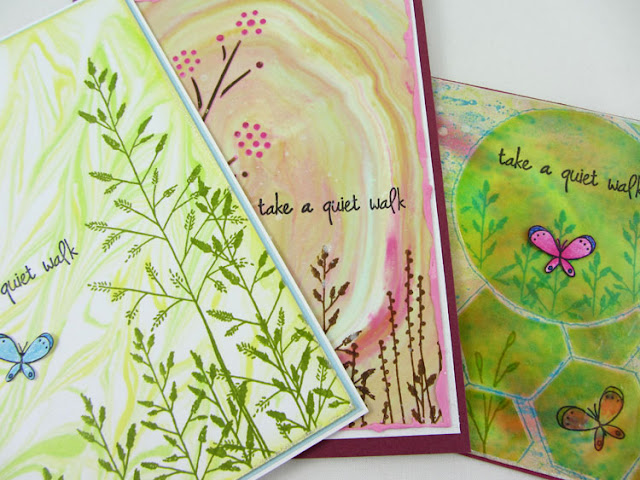
I used a Pitt pen to outline the sections. Metallic glaze dots were added using the end of a paint brush and Metallic Glaze is added around the edges. An extra butterfly was stamped, cut out, and glued on. For more dimension, some leaves were added....


I die cut the leaf branch from another background, cut up the branch, used flower tools to create details and shaping, added some ink for more detail and glued them on.
Bottles
of reinkers tend to just sit in a drawer or on a shelf until we have to
re-ink the pad that they match but they can actually be a larger part
of our creating. I hope this topic helps you to pull out those bottles
and get more use from them. I look forward to seeing what you
create!!!!! Don't forget to link up in the original topic post. And if
you happen to have a can of shaving cream around, have a play, it is a
whole lot of fun!!!!!
Thanks so much for taking the time to read to the end of this post!!!
Hugs, Wanda
Blog: https://artbywanda.blogspot.com/
Facebook: https://www.facebook.com/wanda.hentges
Twitter: https://twitter.com/WandaHentges
Instagram: https://www.instagram.com/wandahentges/
Pinterest: https://www.pinterest.com/wandah/
Hugs, Wanda
Blog: https://artbywanda.blogspot.com/
Facebook: https://www.facebook.com/wanda.hentges
Twitter: https://twitter.com/WandaHentges
Instagram: https://www.instagram.com/wandahentges/
Pinterest: https://www.pinterest.com/wandah/
To join our challenge and win a £50 PaperArtsy gift voucher:
Simply make
something arty relevant to the topic, and link your creation from any
social URL (eg. Instagram, Pinterest, Blog Post etc) sharing your
original make to this challenge page.
The current topic link Topic 16: Reinkers will close 17:00 (London Time) Sunday, September 30th 2018, and the winner will be announced 2 hours later at 19:00.
All
links go in the draw to win a PaperArtsy £50 gift voucher. Please make
sure we can contact you as a prize winner - it helps if you share your
contact info from the platform you opt to use.
Prize
conditions: Please note if you are a successful prize winner our online
shopping cart will give you £50 off the subtotal of products in your
basket. This means you will need to pay the relevant postage on the
order. We cannot figure out how to create a prize with a zero value,
but I guess even paying the postage only is still a good deal right!
Good Luck! If you have any questions, don't hesitate to ask!


9 comments:
Very inspiring Wanda! You made fabulous cards with the backgrounds as well!
It looks like you had a wonderful play time Wanda. I love your finished cards. Fabulous.
These are so pretty, Wanda. I love the delicate stamping which lets those fabulous foamy backgrounds shine.
Alison x
Such a fun technique with the shaving foam. Such unique and fabulous backgrounds. Thank you for the experimenting and the fabulous inspiration x.
Wow, mega post. So many beautiful cards. Never tried shaving foam technique. Let me at it!! Hugz
Beautiful foam technique works. xx
Love all of your experiments, the dreamy, airy shaving foam rocks!!!
Wow, such a great collection. I have never tried the shaving cream technique, but I might now ! Thank you !
Corrie x
Oh wow, you've got some stunning pulls by making patterns in the foam, absolutely beautiful!
Lucy x
Post a Comment