
2016 Topic 19: Die Cuts
Hello PaperArtsy people. Thrilled to be back on the blog today. Had a chance to spend time in person last month with many members of the PaperArtsy family when I taught in the UK. Feel lucky to be connected with such a wonderful and creative group. Now…on to the project.
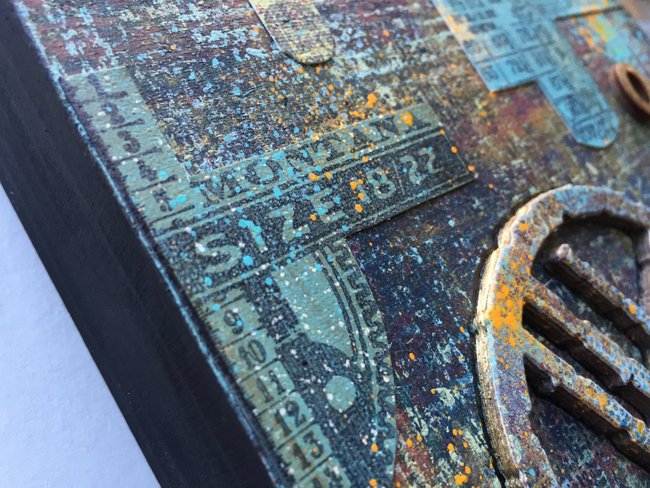
The theme is die cuts but if you know me, you know it is all about layering. I had to add paints, inks, stamps and more.
The theme is die cuts but if you know me, you know it is all about layering. I had to add paints, inks, stamps and more.

I started with a 6 x 6 x 1.5 inch cradled wood panel. After putting down a layer of black gesso, I slathered the surface with Fresco Finish Chalk Acrylics. I used all 4 colors from my own limited edition paint set - Midnight, Terracotta, Mahogany and Buff – and also added Guacamole and Mermaid.


I broke into several sets of PaperArtsy Hot Picks stamps to create a loose design around the border. I chose a number of stamps from both HP1503 and HP1504
 |
| HP1503 |
 |
| HP1504 |

Because my background was so dark, I decided to stamp onto hand painted sheets of watercolor paper. After stamping, I cut the images out and adhered them around the edges.

Given the small size of the panel, I decided to use only one die - Triplex from Spellbinders. Still wanting it to be the star of the show, I ran the die, along with card stock, through the die cutting machine 10 times. I also die cut Triplex once using hand painted paper. I glued each die cut into a stack, ending with the hand painted paper at the top. This way, my die cut was dimensional like an object and had a bigger impact.


I glued the die cut stack onto the panel and outlined the edges with both a black and a gold gel pen for added dimension. I adhered wooden letters spelling the word OPEN. I then splattered paint over the surface for a final touch.


Thanks for joining me on the blog. Look forward to seeing what you all will be doing with die cuts and all the wonderful PaperArtsy products too!
Seth.
Blog: The altered Page
Fabulous dimension Seth, the die cuts build up brilliantly, such a great way to get more out of the dies. The raised pieces also add lovely shadows over other areas. ~Darcy
Seth.
Blog: The altered Page
Fabulous dimension Seth, the die cuts build up brilliantly, such a great way to get more out of the dies. The raised pieces also add lovely shadows over other areas. ~Darcy
We would love to see how you interpret this Die Cuts topic by linking what you make to our 2016 Challenge #19: Die Cuts, on this page HERE.
All of our bloggers love to see your twist on their ideas, particularly if you were inspired directly by their post.
All links go in the draw to win a £50 voucher to spend on products of your choice from the PaperArtsy online store. The Die Cuts link will close 17:00 (London Time) Sunday, Oct 16th 2016. The winner will be announced 2 hours later at 19:00.
love how the die cuts are made so dimensional, the panel looks fabulous. Great to see you creating for PA again, Seth.
ReplyDeleteThe close up detail shots show all those fabulous layers and textures, wonderful project!!
ReplyDeleteStunning project Seth...I love the dimension of the die cuts....and that texture is amazing
ReplyDeleteAmazing layers Seth, both the paints & the die cuts. Great finished piece!
ReplyDeleteWow! Lx
ReplyDeleteSimply stunning, love the way you create your backgrounds
ReplyDeletehugs
Donna xx
How cool!! xx
ReplyDeleteThis has great depth and dimension Seth! Looks very cool!
ReplyDeleteThis has great depth and dimension Seth! Looks very cool!
ReplyDeleteTotally gorgeous... in a grungy way!
ReplyDeleteFabulous! Love the idea of stacking die cuts to create such depth. I would have loved to have been on your workshop, so hopefully you will be doing another one sometime soon!
ReplyDeleteWay cool Seth! Love the dimension you created with this piece!!
ReplyDeleteBeautiful piece. I love the dimension of the stacked die-cut and the layers of color, texture, and pattern.
ReplyDeleteLove, love, LOVE this!! All those gorgeous layers & the stacked die cut looks wonderful.
ReplyDeleteAn amazing totally Seth project. Love it. C x
ReplyDeleteThis comment has been removed by the author.
ReplyDeleteWoooow Seth ! All these ladies were over the moon after your class, I know why now ! Very clever how you have been using the die cutting ... Thanks for sharing your step by step
ReplyDelete