
2016 Topic 6: Liquid Sculpting Medium
Hi everyone Darcy here, we have seen some great projects over the past 10 days using Powertex, Paverpol and Modroc. These are fun products to play with and I urge you to try them if you get chance. In the meantime, if you don't have any of them i wanted to show that other products can produce similar results.
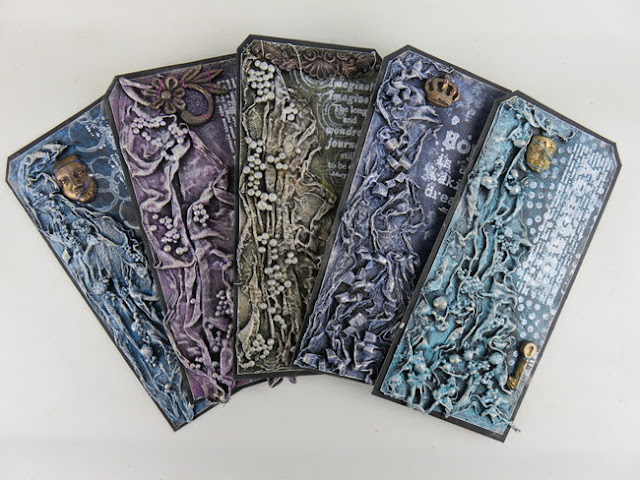

To do that I have created 5 tags with a different product on each one.
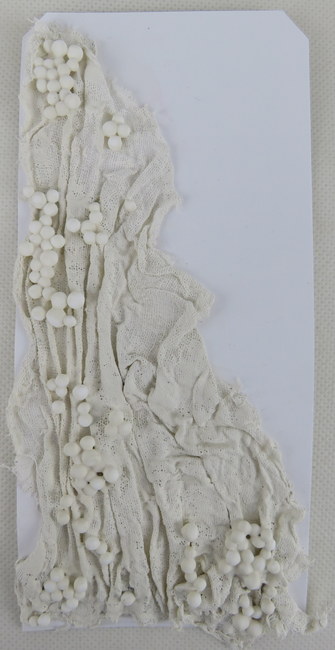
I began by cutting 5 large tags, all the same size, and 5 pieces of muslin fabric. Each piece of fabric was cut in a rough triangle shape larger than the length and width of the tag so that I had plenty to drape.
Step 1.
Tag1. I started with Paverpol, this is white in appearance and very thick and gloopy. I dipped my muslin and allowed it to drip then pulled the fabric up through my fingers. This pushed the liquid into the weave of the fabric and squeezes out the excess. It is super sticky and has a plastic feel to it.
Tag 2. This is Powertex, my bottle is the cream coloured one. It has the consistency of slightly heavier than single cream. It is much less sticky than the Paverpol. However it does have a much stronger smell, almost like a cleaning fluid type of smell.

Tag 3. This is Matte Medium (Winsor and Newton Galeria), it is very runny and has that gluey smell. It is not too sticky, though I recommend cleaning your hands quickly as once dry it is harder to remove than regular glue. I misted my fabric very lightly and then poured on a few drops of the medium before scrunching it up and massaging it well.

Tag 4. This is matte gel (Golden) like the matte medium this is white and just has a regular glue smell, though slightly less than the matte medium. The gel is much thicker and is very sticky. I misted my fabric very lightly and worked the gel in with a palette knife.


Finally Tag 5. This is Grunge Paste. It is creamy in appearance and has a much drier feel. I put some onto my craft mat, and added a little water. I then added my fabric and again I worked it in with a palette knife. It is very easy to work in, but as it is a much drier medium it did require just a tiny smear of gel to help the fabric stick to the tag.

Step 2. Adding extra texture
Tags 1 and 2, these are the Paverpol and Powertex tags. This medium needs to be applied to natural substrates as it will not stick to plastic. Powertex sell some fabulous 3d balls and sand in decent sized pots. 4 sizes ranging from the smallest which is sand through 3 sizes of balls.( Excellent value as you get loads in each pot, however they do a starter pack if you just want a bit of each) I added these to each tag and then add a little more of each of the liquids.

Tags 3 and 4. These are matte medium and matte gel. You have many more options with adding texture here as these glues will stick to natural and synthetics substrates alike. On the matte medium tag I raided my bean bag and added some of the polystyrene balls, with a little medium over them. Onto the matte gel tag I added some pieces of cut up makeup sponge.

Tag 5. Back to the Grunge Paste tag, again there are no restrictions with this medium, it will take to natural and synthetic substrates. I added more of the raided polystyrene bean bag beans.
Results so far.
All the tags were left overnight.
Paverpol: The fabric on this tag is totally solid, no flexibility at all any stray bits of fabric hanging over the tag are extremely sharp. The 3d balls are held in place really well. The medium has now dried clear and is a little shiny.
Powertex: This has a matte finish and feels very solid. Overhanging bits are sturdy but not as sharp as those on the Paverpol tag. The areas that are lower and closer to the tag are more solid, the raised up ridges are very sturdy with a little flexibility. Again the 3d balls are held securely.
Matte medium: This has a matte appearance and has dried clear and is no where near as solid. The folds are held in place but there is a lot of flexibility. The polystyrene beads are well stuck but as you would expect they still feel squishy. overall this has a much more delicate feel and appearance.
Matte Gel: This has a matte feel, and is well set and dries clear. The areas closer to the tag are solid and the raised folds have a little movement, though much less than the matte medium. the edges of the fabric are very hard but not sharp like the Paverpol. The foam pieces are held in place and still slightly soft.
Grunge paste: This is well set and has the chalky matte appearance that you would expect. The folds are pretty solid with very little movement. The balls are well set and have a harder coating , however when pressed hard they do go down.
Step 3. Adding Colour
I added black gesso(Winsor and Newton Galeria) to each tag. They all took the gesso really well, however it is time consuming getting into all the nooks and crannies. Well worth persevering though, as this base layer becomes the shadow for the top layers.

I left the tags to dry over night, and then gave each a good rub with a baby wipe, making sure to rub over a raised area and also a flat area.
The gesso on the Paverpol tag came off pretty easy when rubbed. On the Powertex tag a little came off but it did require stronger rubbing. The other three tags did not give up any paint even with really hard rubbing.
Next I added 3 shades of a colour to each tag using Fresco Acrylic paint. These shades were dry brushed on and then each was topped with a little Chalk to highlight.
I have to say I am more than a little in love with them at this point.

The Paverpol and Powertex tags are the most interesting .However I am very impressed with the Gel tag and the chunks of makeup sponge. Now that the sponge has a coat of gel, a coat of gesso and 4 dry brushed coats of paint they are pretty solid. The Polystyrene balls on the other 2 tags work well, and they are a great substitute if you have nothing else, though even after all the paint they are still slightly soft.
Step4. Finishing off
This isn't really a comparison step as such, but as I had come so far I thought I may aswell finish each tag and then do a final roundup of how each looked. To keep some consistency I will be using ESN stamps to finish each tag.
To each tag I added text in black archival ink, and over that I added a large text using Snowflake paint.
 |
| ESN10 |

Over the white paint I added a background stamp using Pewter for a nice sheen.
 |
| ESN15 |

Then I rubbed White Fire Treasure Gold all over the stiffened fabric. I didn't skimp on the Treasure Gold, I added at least a couple of layers to get a real shine going.

Finally I glued and wired some molded embellishments onto each tag, matching the wire to the colours of the tag.

Here are the five finished tags.
Paverpol:

Powertex:

Matte Gel:

Matte Medium:

Grunge Paste:

As you can see they all look fairly similar, this might help you when deciding which medium to go for.
The Paverpol and Powertex are by far the most interesting visually, the folds are detailed and the 3d balls area great addition. Out of the two, the Powertex has retained the texture of the fabric better and looks a little more natural.
Out of the matte gel and matte medium the more detailed one is done with the gel. It holds the fabric better, where as the one done with matte medium is very soft and a lot flatter. However don't discount this one, if you are going for a much softer look then this may be perfect for you. the polystyrene beads worked great as a cheap addition, but all being the same size does make them look very uniform. I love the pieces of makeup sponge, I will definitely be using those again.
The Grunge Paste tag is a brilliant all rounder. Not as completely solid as the Paverpol and Powertex, but it still holds the fabric really well and has not lost the fabric weave: again the balls are uniform, a grunge paste tag with the 3d Powertex balls would have been pretty much perfect.
So there are my experiments. I hope you found them interesting and helpful. It is very hard to pick a winner, as each has plus points and could be used in different situations. For me personally my favourites would have to be the Powertex tag and the Grunge Paste tag. Which ones do you prefer? Leave your thoughts on them in the comments.
Darcy
Blog: Art and Sole
Twitter: Darcy UK
Facebook: DarcyEclectica
We would love to see how you interpret this topic by linking what you make to our 2016 Challenge #6: Liquid Sculpting Medium, on this page HERE.
All of our bloggers love to see your twist on their ideas, particularly if you were inspired directly by their post.
All links go in the draw to win a £50 voucher to spend on products of your choice from the PaperArtsy online store. The Liquid Sculpting Medium link will close 17:00 (London Time) Sunday, April 3rd. The winner will be announced 2 hours later at 19:00.


28 comments:
what a great experiment, great to see them all side by side like this.
What a useful and clearly expressed post! This sets it all out so well, so that we can make informed choices about these different media. Thank You so much, Darcy for experimenting and sharing your findings. The tags look amazing! I love the depth and texture and the interesting little embellishments you've added. They look good with Sara's stamps too!xx
Really informative post Darcy, thank you :)
wow Darcy these are gorgeous!!xx
I remember you bringing a tag like this to Donnie and I bought some muslin to have a go. I hope I get time to have a go. Fantastic tags xx
They are ALL absolutely fabulous. Every single one turned out beautifully didn't it. What a great comparison. Really useful. Thanks Darcy. Lx
Very useful and informative post Darcy! Great comparisons and the tags look fabulous!
Hugs
Lesley Xx
this is really useful Darcy...thank you....great experiment and great to see the differences
this is really useful Darcy...thank you....great experiment and great to see the differences
Brilliant post. Really explains how each medium works and what the results will be. Based on this I would get all of them for different projects!
Wonderful post and so informative! The tags are all stunning, and from the photos they all look superb (and there does not seem to be that much difference,The end result is simply brilliant, - thanks for the inspiration!!
Absolutely fabulous. Love how you finished them off. Going to have to give it a try in my journal.... think the cover might end up using these techniques!
I agree on your choices of favourites but even if mine turns out even close to as good as any of these I will be amazed!
Catherine xxx
Thanks for testing these mediums for us, I feel more confident in tackling my own sculpted project!
I must say some of these challenges are rather daunting, but they do get the wheels a rolling! This one is the most challenging so far, IMO, and with that I sincerely appreciate this very thorough tutorial! I'm in love too and will definitely be experimenting with alternative mediums for this technique! Great results, each one and the color really ups the wow factor! I mean WOW!!! :) Thank you Darcy! <3
WOW! Love fabric, love draped fabric, love texture, love color..... fantastic post!! Won't have time to play this time, but definitely keeping this all in mind! The addition of the various dimensional elements was brilliant!! xx Lynn
Thankyou so much Darcy for doing this and sharing the results with everyone. I love Powertex and am learning more every day about mixed media and other products to use, so this is so helpful. I love the tags you have made and also the way you have incorporated the PaperArtsy stamps which are so orginial in design. Having been a teacher for 36 years and fairly newly retired, I am now on a learning journey of my own, so all your blogs I find to be quite inspirational.
Thanks again
Pam
Thank you very much for the great comparisons. Going to try this with Grunge Paste as that is the only one I have.
Love, love , love your tags, beautiful.
Brilliant Darcy, both in tags and comparison tutorial. Thank you.
That's really useful Darcy well done I might just have a go LOL
Happy craftin
Rebecca
How interesting and really very useful blog post. Thank you for the in depth step by step and fabulous to see them all side by side. No clear favourite for me...all Fabulous!
Well I'm thrilled that you thunk to do this. I remember you doing a GP thing like this before, but what a fab comparison. I guess the only other factor would have been an attempted costing across products, because if they all end up liking similar, then logic would say opt for the cheapest thing. I like that you can do this style of sculpting with an existing product that most of us probably already have to hand. TFS!
Brilliant post! I've never heard of the first two products you used and you have definitely given me some ideas for a play when I have some time. A faovrite? No way. They're all wonderful!
Great experiment and thanks so much for giving this a very professional test. Just from the looks, I prefer the Matte Medium but that is only because I like the color, the balls, the folds. I can't touch or really see so its not really fair. I use Elmer Art Paste that is very safe, especially for kids, just let it dry on your hands and it peels off. It stiffens fabric like a champ and paper - wow you can mold it into whatever shape you want. I draped bathroom paper hand towels, dripping wet over an empty plastic bottle with a stryofoam ball glued on top and wire "arms". The "dress" and "hair" and bows, ruffles, flowers, (all made from scrunched wet paper towels) were piled on and it dried hard in several days. Living in humid Florida I can't use ModPodge since it continually redampens enough to peel paper off and stick to surfaces so I'm thrilled that this sculpture has lasted for years with no ill effects. It dries clear so printed fabric may work well but is easily painted and very cheap. It comes dry and you mix it in water in a bucket then dip paper strips in and lay on your armature. I think I will try using it as you have done to see how it works on a tag or paper or cardboard even. Thank you again for your work.
This is such a thorough and timely comparison, Darcy and I'm so grateful you have done it for us! It's just what I needed! Beautiful results! I agree with Leandra that price is an important factor and also with what's been said about different products for different projects.
Lucy x
Fantastic explanations Darcy with fabulous results. Great inspiration, thanks! x
Amazing project Darcy! wonderful the fabric drapes and harmony with the embellishments. Great constitution. Thank you for share of us. xxx
This is totally AMAZING.... What a fabulous post, another stunning project by Darcy oooh!!!!!!! also so interesting to have such great feedback and comparison, a big thank you Darcy for sharing all your art and experimentations so well xx
Reallly excellent bloog post, Darcy, thank you very much. All of your experiments look gorgeous.
Post a Comment