
Hi everyone, Darcy here. Since discovering mediums and gels, several years ago, I have found myself using them above all other glues, they are just so strong. At first I assumed they were just that, a glue. But I soon discovered that they are in fact a much used tool of artists. Their original uses were as extenders,thickeners and flow improvers of paints, it is only with the popularity of mixed media that they have become known as glues. There are also the much thinner mediums, known as glazes.
If you take a look in the PaperArtsy store you will find some Matte Gel , this is just one of the many mediums available, but in my opinion is by far the most useful. i would like to show you a project today in which I have used this gel 15 ways. I surprised even myself.
Make a drink and get comfy, there are lots of photos. perhaps by the end you will view your glue pot in a whole new way.

First let's look at the difference between Matte Glaze and Matte Gel, both sold by PaperArtsy. The glaze is much thinner, and runny. This is perfect for mixing with opaque colours, making them much more translucent. It can also be used as a glue for thin items such as paper to paper. The gel is on the right and as you can see is much thicker. When they are both spread out, the gel holds it's shape while the glaze is almost flat.

 |
| Matte Gel |
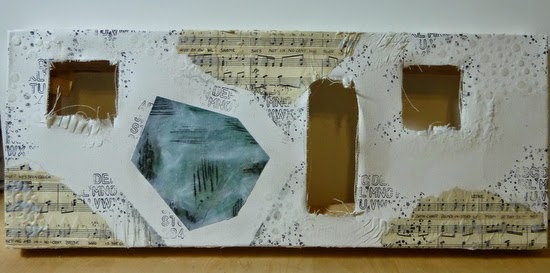
1. Resist. I started with an 8x20 box canvas. Then using a palette knife, I applied some gel through a stencil in a few random places. This is going to act as a resist later.

2. Glue. I then used the gel as a glue, and attached some music paper. I also cut some holes in the canvas.

3. Stencilling, as in step one, I used the gel through another stencil, over the top of the music paper.

4. Catalyst Tools. These are fabulous tools, and you may have seen them on the PaperArtsy stand at shows. If you have missed them, then do check them out at the next show. They are silicone tools, each with different edges and teeth. The most wonderful textures and shapes can be created with them. They work with paints, and of course with the gel. (btw they are great tools for use with gelli plates)
Here I used a palette knife to apply gel to the sides of the canvas, then I used the catalyst tools to create patterns.

5. Bubble wrap. I found that this left a wonderful impression in the gel. The best way is to press the bubble wrap into place and leave for at least 10 mins, then peel it up. this gives a much better impression than if you lift it straight back up.

6. Clean edges. I saw this technique on the Golden site, so have to thank them for this nifty technique. I was truly amazed at how well it worked. I used this masking tape to create a shape, then I filled it with a layer of gel. Using a ruler to scrape across it to level it. I then left it to dry.

7. Scratching. When it was almost dry, I used a pokey tool to make sure scratches. I then painted the shape with Bora Bora, over this I rubbed some Little Black Dress, making sure it went into the scratches. only once the paint was dry did i pull up the tape. I was thrilled at how clean and straight the edges were. No paint had bled under the tape due to the gel being using first. I rubbed on a little Snowflake, just to knock it back slightly.

I added some random stamping, using black archival and Mini 18, and Mini 72. This was done onto the canvas, not into the glue. Because canvas is textured the stamping is a bit patchy, which is what I needed, as this is just a background element.


Now for some colours. My first layer was Limelight. I applied a little paint then rubbed it in with my fingers, making sure it went down into all the crevices between the different textures of gel. then I quickly wiped it back with a cloth to remove it from the gel.

I did the same on all four edges, making sure the canvas was well covered but that the gel was wiped to stay clean.

9. Stamping. Now to add another layer of texture. I applied gel with a palette knife and then stamped into the gel with lids and an empty barrel from a pen.

I added random patches of circles all over, and left it to dry.

Now for more colour, this time I used Inky Pool. I used the same technique as before - apply paint, rub it in and wipe back off. This gave me areas of blue and limelight layered, some areas wiped back to the Limelight, and some areas still white where the gel was acting as a resist back to the original canvas.

10. Transfer. I printed off a photo of a poppy, just using a regular inkjet printer. I applied a thin but even layer of gel onto the hard edged shape, then lay my photo face down. I smoothed it out and left it to dry.

11.Skins. I am sure you have all made paint skins before, they occur naturally around the lid of your paint bottles, and you can create fantastic skins by painting layers onto a craft mat. Gel skins are made in the same way. I applied some lines of gel onto a craft mat, forming a grid. I did this by dipping the edge of a ruler into gel and then dabbing it onto the mat. I left these to dry overnight, and peeled them carefully away from the mat. I was left with this grid.
You can see the gel does not dry completely clear. if you use a very thin coat, it is 'almost' clear, the thicker the layer of gel the more 'milky white' it becomes.

I painted these grid skins with Bora Bora, then applied some Indigo Treasure Gold, and finally rubbed on a little White Fire. I applied a little more gel to the back and glued them over the holes on the canvas.

This is how it looks now. I misted the transfer with water and rubbed the backing away to reveal the poppy. I felt the canvas needed a pop of colour, so i rubbed on some patches of Blood Orange.

12. Die Cuts. I made another skin, by spreading some gel onto a craft mat and dotting on some colours of paint. Inky Pool, Blood Orange and Tango. I then marbled them using a cocktail stick. I left this to dry overnight.

Once dry, I peeled it up from the mat. I lay it between 2 pieces of non stick paper ( freezer paper) I added a metal die of the song bird, and ran it through my Big Shot. I wasn't sure how badly the whole thing would stick to the plates which is why I added the freezer paper, just to prevent unnecessary stickage. The bird die cuts came out cleanly and easily.

13. Moulds. I first, and importantly, wiped my moulds with vaseline. Then I added the gel and levelled each one off. I left these to dry overnight, and was thrilled with the details on them when I popped them out. i coloured them with Treasure Gold. You can see here how opaque the gel is, even when dry, this is just due to the thickness.

14. Stiffener. I added a little gel to 3 pieces of hessian fabric and worked it into the fabric with my fingers. i then curled the fabric and left it to dry.

15. Paint thickener. This of course is the original use of gel. I put a good amount of gel on my craft mat and added just a little Pea Coat. I mixed it with a palette knife and it gave me a fantastic, thick paint. I applied it around the edge of the canvas. Because of the thickness, I was able to add peaks and blobs that I knew would stay in place.

With my left over 'thick' paint, I popped some into this old empty bottle. ( This had childrens glitter glue in it, I bought it just for the squeezy bottle. I emptied out the glitter glue, washed out the bottle, and now I have a great little applicator. it has a fine nozzle, and is very useful)
I used this to pipe dots around my hard edge shape. The thick glue/paint is now a dimensional paint, and these dots are raised up.

So there we have 15 ways to use gel. I am sure there are many more. Now to glue it all together. I attached the rolls of stiffened hessian fabric.

I attached the moulded gel buttons.

Glued on one of the die cut skins.

and added a few dabs of gel here and there, then I sprinkled on some gold mica flakes.

Finally, because of the holes, you can see through to the back of the canvas. So I cut some cartridge paper and glued it to the back.

Just look at all that lumpy,bumpy,scrummy texture.

I loved every minute of making this canvas.
Have I convinced you, that there is more to glue than just 'sticking stuff to other stuff'' I hope so, go grab your gel medium and see what adventures you can create.
Darcy.x
If
you would like to join in our weekly challenge with any of this
week's guests who have blogged since Sunday night, then
join in to link up your creativity HERE you will go in the draw to
win PA stamps of your choice! You need to link your entry
by17:00 (London time) Sunday 27th July 2014


30 comments:
wow, what a fabulous post, some fantastic uses of the gel, I love the skins! will try and play over the weekend.
So cool!!! I love the skins, especially the marbled one, but the whole canvas looks amazing. Thanks for all the great ideas Darcy.
Fabulous playing, great textures, exciting skin effects. Great post Darcy. X
WOWZERS!!! I use this stuff all the time but not in most of those ways...you is brilliant :D XXX
Fabulous post Darcy, wonderful inspiration!
Great tute Darcy, your canvas looks amazing! xxx
This post and the piece you made are both wows on so many levels. And no doubt a lot of work too!
Darcy, thanks so much for sharing this. I'm unfamiliar with using gel so this post has been fascinating. I now intend to get some and start playing. I adore your canvas, and especially love using gel to create embellishments and grids. Thanks again. Jean.x
This is just amazing! Love all these experiments! I use matte gel all the time, for everything, but I have a much thinner product and haven't tried it for half the things you have on here so I definitely want to change brands and try some of the techniques here. Looks like a lot of work went into this but a lot of fun!
Lucy x
Amazing ways to use matte gel! Love the marbled skin idea, I would never have thought of that!
Lol, as I was waiting for the comments box to pop up I was thinking 'What a fabulous post!' and what was the first comment I saw? Yep, Helen saying exactly what I was thinking, lol! Thanks Darcy, that was brilliant and a useful reference tool too!
Hugs
Lesley Xx
Wow!! What a wonderful canvas, great many many techniques and idea!! I was very inspired this canvas.
I can't try this time but I'll try and play with a time. Thank you for share of us xxx
Wow - this is one to bookmark and come back to again and again - so much fun, so many ideas, so cool! Thank you for sharing your adventures!
Alison xx
Oh wow Darcy, what a brilliant post. Thank you so much for sharing all these techniques. If I wasn't in a premiere inn in Cardif I'd go play now. Xxxxx
Wow, Darcy...this is mind blowing. 15 ways! You really sold that gell...loved the way you used to make those grids and die cuts...genius! Very well explained tute...thanks.
WOW, this is an amazing post. So many ideas and fabulous instruction. Thank you so much!!
Ohh my, Darcy you are amazing!!
Fun techniques ,I would love to refer for my future projects. TFS
Canvas turned out 'incredible'
This is awe inspiring stuff arcy. You MUST do a workshop on this, please! And it must be when I'm available!! xxx
Pure genius.
I'm pinning for future reference as my brain is sievelike at the moment.
Thanks so much for this great info!
Agree with Steven, please do a workshop on this Darcy & somewhere i can get to please!
Thank you for sharing your play time & so many techniques. I have a pot of Galleria Structure Gel, so far i have used it as a resist; never thought to use it in any other way.
Can see me trying out some of the techniques very soon. You are a star Darcy and i am a huge fan of yours:-) xxx
Wow, Seth sent me and I'm impressed. I'm adding you to my blogroll. Big thank you!
Ooooh... This is a FABULOUS work... Also a FABULOUS tutorial!!!! Many, thanks to you Darcy, you have an unbelievable talent, and that's so great to follow you. I've learned a lot again today! Coco xxx
What a fabulous project Darcy :-) thank you for sharing this amazing step by step showing new techniques and the most wonderful details/photos. I love it !!!
Crafty hugs Annie x
I am definitely bookmarking this one, Darcy! So many fab ideas! How creative and industrious you are! Great tutorial! xxx
Wow, what an amazing post! Love, love, love everything you've done with the gel and thank you so much for sharing it all with us. I'll never look at a bottle or jar of medium the same way again!
LOVE!!!
wow what great techniques, I will look at my mediums with new eyes now - can't wait to have a go at these :)
WOW! GREAT POST Darcy. Thanks for all this info. I knew of some of the traditional uses of mediums in painting plus a couple more like using as as a resist, and the transfer technique. I've used it not thinking of it as such, but "as a basic glue" knowing acrylic binds stuff as it dries, great in collage and sticking paper layers but never thought of all those other uses. Thick ones, thin ones, flow improver, paint thickener, paint retarder, gloss & matte medium. There are so many different mediums it can be daunting which ones to use and which techniques they can be used for. I'd never thought of making skins, shaping stuff and using in moulds and using with stencils is something I've not tried either, this just goes to show every day is a learning opportunity.
You're very talented and such an inspiration. Thank you!
Alexandra x
oh my goodness Darcy-you have surpassed yourself this time-fantastic techniques!!
Pretty darn amazing! 15 ways to use matte gel medium!
I will never look at it in the same way again! Thank you Darcy, a great tutorial!
Post a Comment